Alli User Guide - Android SDK Integration
Alli SDK supports Android on mobile. #google #manual


If you're experiencing trouble with Alli's Android SDK, please check the SDK version. You can always download
The first thing you need to do is adding the SDK in your project.
Alli SDK requires Android 4.4 (API level 19) or above.
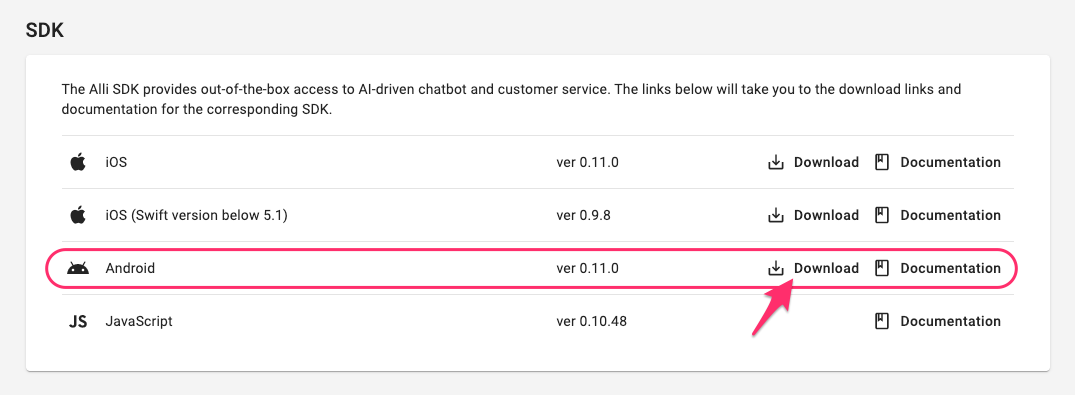
Step 1. Download and import the SDK
- Login to Alli dashboard and proceed to the Settings menu. Scroll down to find Android SDK download and download the SDK.
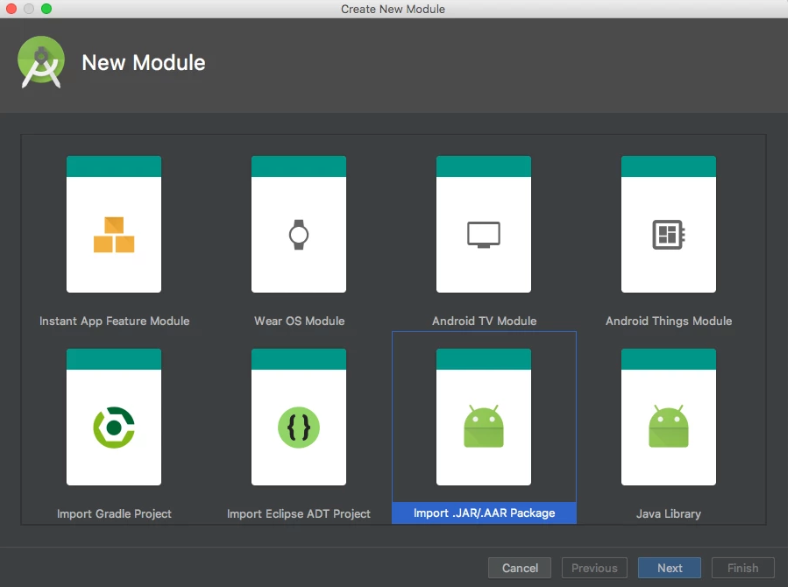
- In Android Studio, go to File > New > New Module and import Alli SDK into your project:
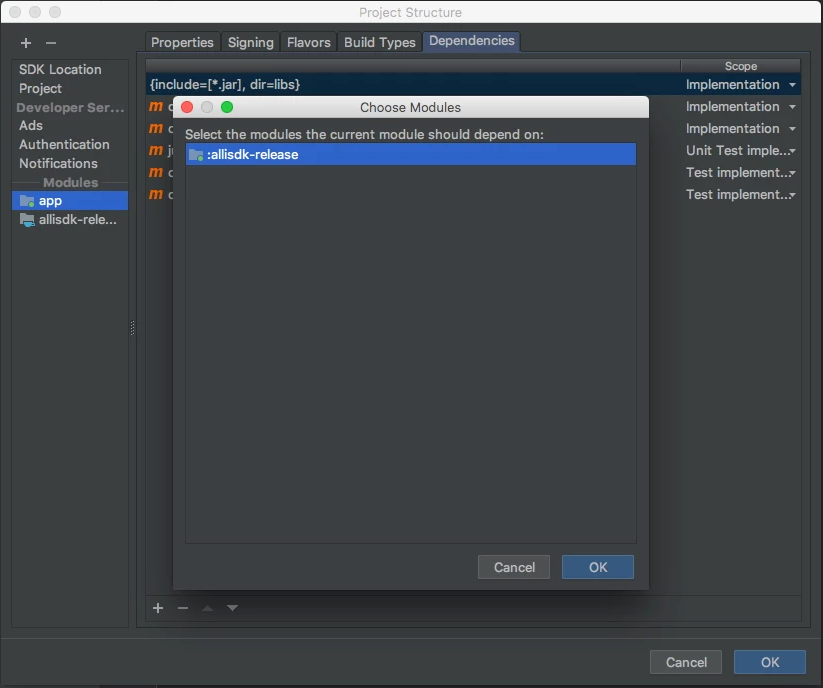
- Add
allisdkas a dependency in File > Project Structure > Dependencies.
Step 2. Add Alli SDK as dependency
Go to the build.gradle file for your app module and add Alli SDK as a dependency:
  dependencies {
    implementation project(":allisdk")
  }
Step 3. Add app permissions
Add the following to the AndroidManifest.xml:
  <manifest>
    <uses-permission android:name="android.permission.CAMERA" />
    <uses-feature android:name="android.hardware.camera" />
    <!-- file upload permission for v5.0 -->
    <uses-permission android:name="android.permission.READ_EXTERNAL_STORAGE" android:maxSdkVersion="18"/>
    <!-- external storage use permission -->
    <uses-permission android:name="android.permission.WRITE_EXTERNAL_STORAGE" />
    <uses-permission android:name="android.permission.INTERNET"/>
  </manifest>
Step 4. Configure Java 8 language feature
Make sure your Android plugin is 3.0.0 or higher and configure it as the following in the corresponding build.gradle file:
  android {
    ...
    // Configure only for each module that uses Java 8
    // language features (either in its source code or
    // through dependencies).
    compileOptions {
      sourceCompatibility JavaVersion.VERSION_1_8
      targetCompatibility JavaVersion.VERSION_1_8
    }
  }
Steps 5. Initialize Alli SDK
- Make sure the Alli SDK are imported in your main file:
  import ai.allganize.allisdk.Alli;
  import ai.allganize.allisdk.AlliErrorCode;
  import ai.allganize.allisdk.AlliEventHandler;
- Initialize the Alli library with your API Key by adding the following in
onCreate()method in your application's first Activity class:
  protected void onCreate(Bundle savedInstanceState) {
    ...
    // new Alli(String apiKey, WebView webView, AlliEventHandler eventHandler, boolean showHeader, boolean showFooter, boolean showBackButton)
    // showHeader - optional, default: true, If you want to remove the header, turn off this option.
    // showFooter - optional, default: true, If you want to remove the footer, turn off this option.
    // showBackButton - optional, default: true, If you want to remove the back button on the header, turn off this option.
    alli = new Alli("YOUR_API_KEY", webView, this, true, true, false);
    alli.initialize();
    ...
  }
Update on June 2021
Now you can use all the available parameters in the Javascrip SDK for the Android SDK .
Use HashMap<String, Object> type to send the parameters used in initializing Javascript SDK to Alli's argument.
alli = new Alli(this, apikey, webView, this,
                new HashMap<String, Object>(){{
                  put("header", true);
                  put("footer", false);
                  put("backButton", true);
                  put("styleOptions", new HashMap<String, Object>(){{
                    put("conversationContainer", new HashMap<String, Object>(){{
                      put("right", 50);
                      put("left": 50);
                      put("bottom": 50);
                    }}
                  }}
                }});
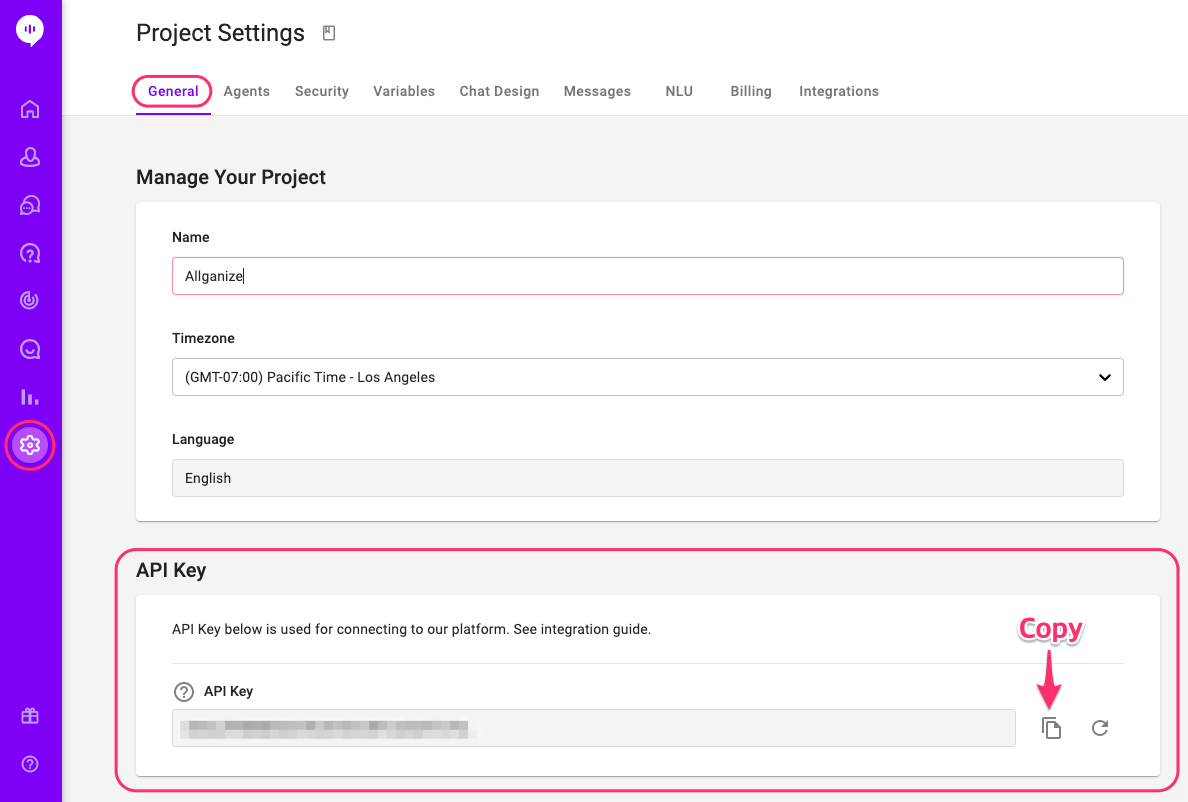
You can find your API Key under Settings > General:
- Add this in the same Activity class for permissions:
    @Override
    public void onRequestPermissionsResult(int requestCode, @NonNull String[] permissions, @NonNull int[] grantResults)
    {
        super.onRequestPermissionsResult(requestCode, permissions, grantResults);
        alli.onRequestPermissionsResult(requestCode, permissions, grantResults);
    }
    @TargetApi(Build.VERSION_CODES.LOLLIPOP)
    @Override
    protected void onActivityResult(int requestCode, int resultCode, Intent data) {
        super.onActivityResult(requestCode, resultCode, data);
        alli.onActivityResult(this, requestCode, resultCode, data);
    }
Step 6. Create chat window
To create the chat window and start a conversation with your customer, make the following call:
alli.event();If you want to specify the User ID and the Placement, use the format below.
// user id: "USER-123"
// placement: "LANDING"
alli.event("USER-123", "LANDING", context);
For users logged into your app and you know who they are, you can tell Alli who they are using the user id. You can also set a temporary id for users who are not logged in.
Placement is a place and point in time in your app where you might want to display a skill flow to your users. Once you have created a Placement, you can change the skill flow at that Placement with the Alli Dashboard. You can think of an Alli Placement as a billboard, and an Alli skill as what gets shown on that billboard. The power of the Placement system is that you can decide what campaign to show at a placement whenever you like.
You should implement the Alli chat window in the parent view controller and assign the parent view controller as the delegate property. It is vitally important that the ViewController passed to this call be the top-most view and that it be unobstructed by other views. Parent view should have a minimum height and width.
Update on June 2021
Same as the constructor, event function is added to use all the available Javascript parameters.
alli.event(new HashMap<String, Object>(){{
            put("user", new HashMap<String, Object>(){{
                put("id", userId.getText().toString());
            }});
            put("placement", placement.getText().toString());
            put("variables", new HashMap<String, Object>(){{
                put("test", "test value");
                put("AGE", 31);
                put("BIRTHDAY", "2021-06-30");
                put("boolean", true);
            }});
        }});
※ Please mind the format of the userId above.
Step 7. Delegate methods to handle Alli events
The following delegate methods will provide feedback on the chat conversation status:
  public protocol AlliEventHandler {
    // Called when initialized successfully.
    // You may receive NOT_INITIALIZE_YET error if
    // called before this event.
    void onInitialized(WebView view);

    // Called when chat started successfully.
    void onConversationStarted(WebView view, String userId, String placement, Object context);


    // Called when conversation did not start
    // even when Alli.event was called.
    void onConversationNotStarted(_ view: WKWebView!, userId: String, placement: String, context: Any?)


    // Called when user has closed the chat
    // window or Alli.close() is called.
    void onConversationClosed(WebView view, String userId, String placement, Objective context)

    void onError(WebView view, AlliErrorCode errorCode, String userId, String placement, Object context)
  }
Step 8. Link to other Apps
Use this format to add links to other applications. Below is an example to link to the Google Map.
    @Override
    public boolean handleUrlLoading(String url) {
        Uri gmmIntentUri = Uri.parse("geo:37.4919653,127.0330243");
        Intent mapIntent = new Intent(Intent.ACTION_VIEW, gmmIntentUri);
        mapIntent.setPackage("com.google.android.apps.maps");
        startActivity(mapIntent);
        return true;
Tip: Advanced WebView
Android WebView's performance isn't that great, so here's an open source Advanced WebView that you can use that we recommend to use with Alli SDK.
You can check out the library here.
Below is a brief guide of how to apply it to Alli SDK. Since this library is a simple extend of the basic Android WebView, you can use the existing interface and just replace the WebView declaration part.
Step 1. Install the library
In the project’s build.gradle:
allprojects {
    repositories {
        maven { url "https://jitpack.io" }
    }
}
In the app’s build.gradle:
dependencies {
    implementation 'com.github.delight-im:Android-AdvancedWebView:v3.2.1'
}
Step 2. Replace WebView
Replace “webview” to “im.delight.android.webview.AdvancedWebView” in activity_main.xml file.
<im.delight.android.webview.AdvancedWebView
    android:id="@+id/webview"
    android:layout_width="match_parent"
    android:layout_height="match_parent" />
This is how the basic webview is declared in the code:
WebView myWebView = new WebView(activityContext);Use below instead to declare AdvancedWebView:
WebView myWebView = new AdvancedWebView(activityContext);Step 3. Build
After gradle sync, you can install and build the library!
Learn More About Allganize's Technology