Alli User Guide - JavaScript SDK Integration
Alli SDK supports JavaScript integration in these easy steps. #JS

Integration
Alli Javascript integration is simple and easy. Just copy and paste the following code to your website:
<head>
<script src="https://sdk.alli.ai/latest/alli.js"></script>
</head>

<body>
<!-- ...Your website content... -->

<!-- Start of Alli Code -->
<script>
  // apiKey is unique identifier provided by Alli
  Alli.initialize({
    apiKey: "YOUR_API_KEY",
    debug: false, // if you turn this on, debug info will be printed in the console
    backButton: true, // optional, default: true, If you want to remove the back button on the header, turn off this option.
    providerLink: true, // optional, default: true, If you want to remove the link on the Alli provider logo, turn off this option.
    styleOptions: { // optional, to customize style.
      conversationContainer: {
        right: 50, // offset from the right (applied when SDK position is set to right on project settings)
        left: 50, // offset from the left (applied when SDK position is set to left on project settings)
        bottom: 50 // offset from the bottom
      }
    }
  });
  if (window.Alli) {
    window.Alli.event();
  }
</script>
<!-- End of Alli Code -->
</body>
If you can see Alli’s chat dialog popup in your website bottom right corner, then boom. It’s done!
The following sections explain advanced integration.
Initializing SDK
Copy and paste the code inside your webpage’s <head> block.
<head>
<script src="https://sdk.alli.ai/latest/alli.js"></script>
</head>

<body>
<!-- ...Your website content... -->

<!-- Start of Alli Code -->
<script>
  if (window.Alli) {
    //apiKey is unique identifier provided by Alli
    Alli.initialize({
      apiKey: "YOUR_API_KEY",
      debug: false,
      backButton: true
    });
  }
</script>
<!-- End of Alli Code -->
</body>
Starting Conversation
After you have initialized the SDK, please call the following with one of the options below to start conversation:
if (window.Alli) {
    window.Alli.event();
}
Option 1: Getting started. No user ID and no Placement. Simply call the below. That’s it.
window.Alli.event();Option 2: If you know the user ID and want to specify the Placement:
window.Alli.event({
    user: {id: "YOUR_USER_ID"},
    placement: "YOUR_PLACEMENT"
});
For more details about the user ID and the Placement, please find the 'Identify Your Users' and the 'Placements' part from below.
Advanced Integration
The advanced integration guide provides detailed explanation of all of Alli’s features.
Adjust Alli toggle icon location
You can adjust Alli's toggle button's default location, and prevent moving the toggle with drag & drop if you want.
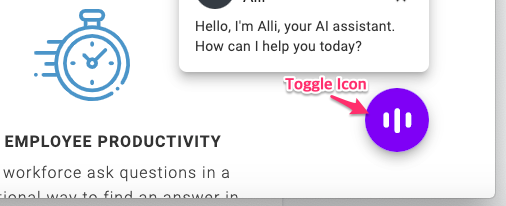
To adjust the default location, change the value under the StyleOptions > ConversationContainer > right, left, bottom when initializing. Default value is 50.
To prevent moving the toggle icon by drag & drop, you can set disableToggleDrag as true.
Alli.initialize({
    disableToggleDrag: false, // optional, default: false
    styleOptions: { // optional, to customize style.
    conversationContainer: {
      right: 50, // offset from the right (applied when SDK position is set to right on project settings)
      left: 50, // offset from the left (applied when SDK position is set to left on project settings)
      bottom: 50 // offset from the bottom
    }
  }
});
Loading Alli window in full screen without the toggle icon and the preview
In some cases, Alli needs to be loaded without the toggle icon and the preview but with full UI in full screen. For example, when being used on a small screen like mobile browsers. You can use popupMode and launcher for this.
Alli.initialize({
  popupMode: true,
  launcher: false
});
When popupMode is true, Alli loads up full UI in full screen. When launcher is false, Alli doesn't load the toggle icon.
Identify your users
Alli uses cookies to identify the site visitors who cannot be identified by user id. We will lose the history if the user clears their cookies or goes to a different device.
For users logged into your website and you know who they are, you can tell Alli who they are. You can also set a temporary id for users who are not logged in.
In this example, the user id is USER-123:
window.Alli.event({
    user: {id: "USER-123"}
});
if you want to send user information such as email, address and etc, please see 'Assign values to variables' section below.
Assign values to variables
To assign certain values to variables at the beginning of a conversation:
window.Alli.event({
    variables: {
        "VARIABLE_NAME":"VARIABLE_VALUE"
    }
});
You can use this function to save certain customer information to variables. Please note that the variable should already exist in the Alli dashboard.
Below is an example of assigning an email to a specified user:
if (window.Alli) {
    window.Alli.event(
      {
        user: {id: "YOUR_USER_ID"},
        variables: {
            "EMAIL":"email_address@gmail.com"
        }
      }
    );
}
Placements
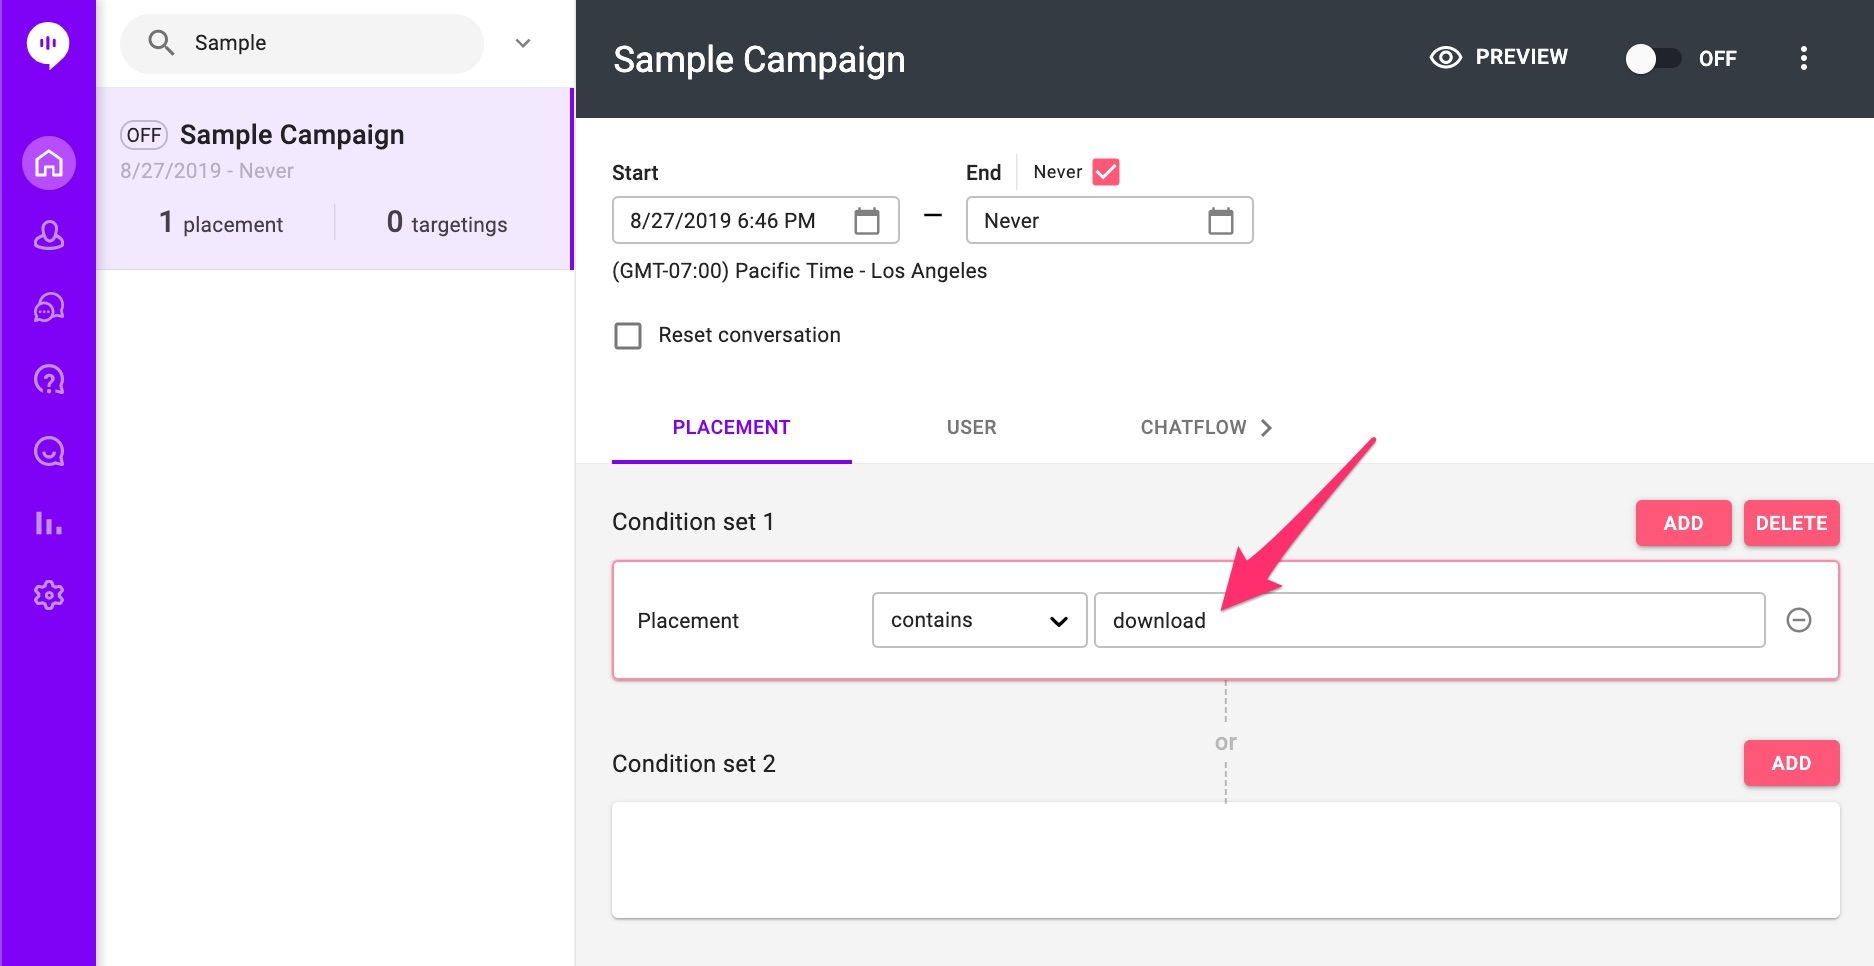
One of the most important and unique concepts in using the Alli SDK is placements. Placement is a place and point in time in your app where you might want to display a campaign chat flow to your users.
Static Placements
Once you have created a Placement, you can change the campaign chat flow at that Placement with the Alli Dashboard. You can think of an Alli Placement as a billboard, and an Alli campaign as what gets shown on that billboard. The power of the Placement system is that you can decide what campaign to show at a placement whenever you like.
In this example, the placement is called shopping:
window.Alli.event({
    placement: "shopping"
});
Dynamic Placements
Alli SDK also sends the URL automatically so that you can use the URL patterns for the dynamic placement in the campaign setting. To use dynamic placement, simply don't put the placement information. Instead, for example, if you want to start a campaign in the url of “/download”, you can set the placement by using the “contains download” in the Alli dashboard. Please keep in mind that SPA (Single Page App) doesn’t work with Dynamic Placements.
Enable speech recognition
You can enable speech recognition so Alli can convert voice input to text automatically. First, add below before initializing Alli:
var recognition = new Alli.__CustomSpeechRecognition__('wss://task.ecs-backend.alli.ai:3000/', { path: '/stt' });
recognition.interimResults = true;
recognition.maxAlternatives = 10;
recognition.continuous = true;
Then, add below with other options when initializing:
Alli.initialize({
  recognition: recognition
});
When the speech recognition is successfully enabled, you'll see a mic icon next to the text input field and the send icon. Click the icon to activate/deactivate voice input.

Supported Browsers
- Chrome (version 64 or above)
- FireFox (version 60 or above)
- Opera (version 50 or above)
- Safari 10 or above
- Internet Explorer 11
- Microsoft Edge (version 40 or above)
Learn More About Allganize's Technology