Alli User Guide - Automation 2.0
Welcome to Automation 2.0, a complete overhaul of our previous automation suite. Automation 2.0 provides users easy-to-understand tools to automate common workflows.

Welcome to Automation 2.0, a complete overhaul of our previous automation suite. Automation 2.0 provides users easy-to-understand tools to automate common workflows: sending a toggled reminder (e.g. about a new PTO policy) when a user asks a related question (e.g. about vacations), automatically modifying documents in Knowledge Base upon upload, etc.
Since Automation 2.0 automates features of Alli, this user guide will contain frequent references to such features. Please follow the linked user guides for more information. Furthermore, not all features will be available upon release, we will be gradually adding more triggers and actions over time (more on that next). Also note that existing automation workflows will be automatically migrated to the new system.
Introduction
We will begin by introducing some key terminology. Automation 2.0 is centered around creating workflows, which are chains of actions (which execute in sequence) which start upon some predefined trigger. In other words a workflow consists of a trigger plus one or more actions. For more details on specific triggers and actions, please refer to their respective sections below.
Let us briefly discuss how to navigate the menus of Automation 2.0.
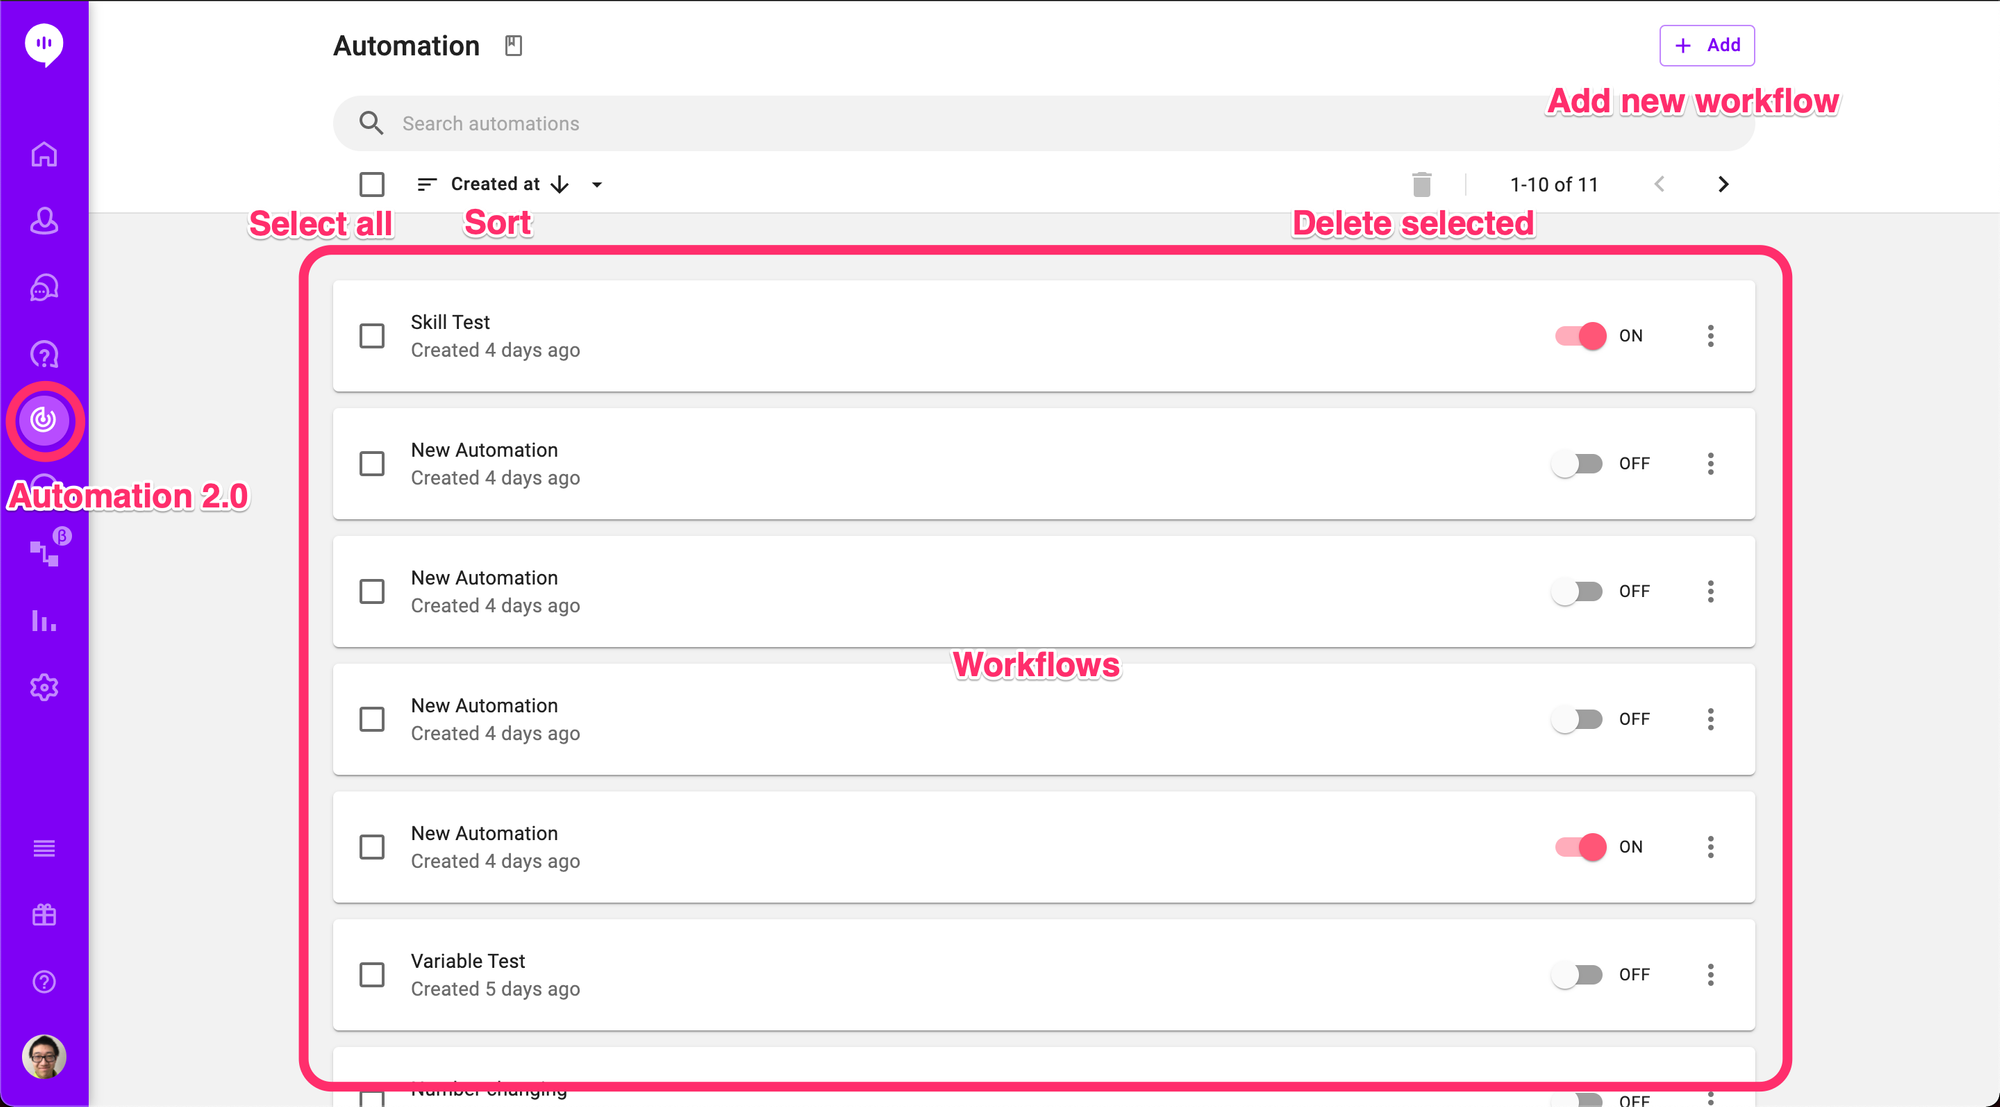
You can find Automation 2.0 by clicking the icon in the navigation bar. If you are unable to find the icon there, make sure to enable it first by editing your sidebar (click the ≡ icon on the bottom left). Once you have Automation 2.0 open, you can create a workflow by clicking the "Add" button on the top right corner. Then, click on a workflow to open to the workflow editor.

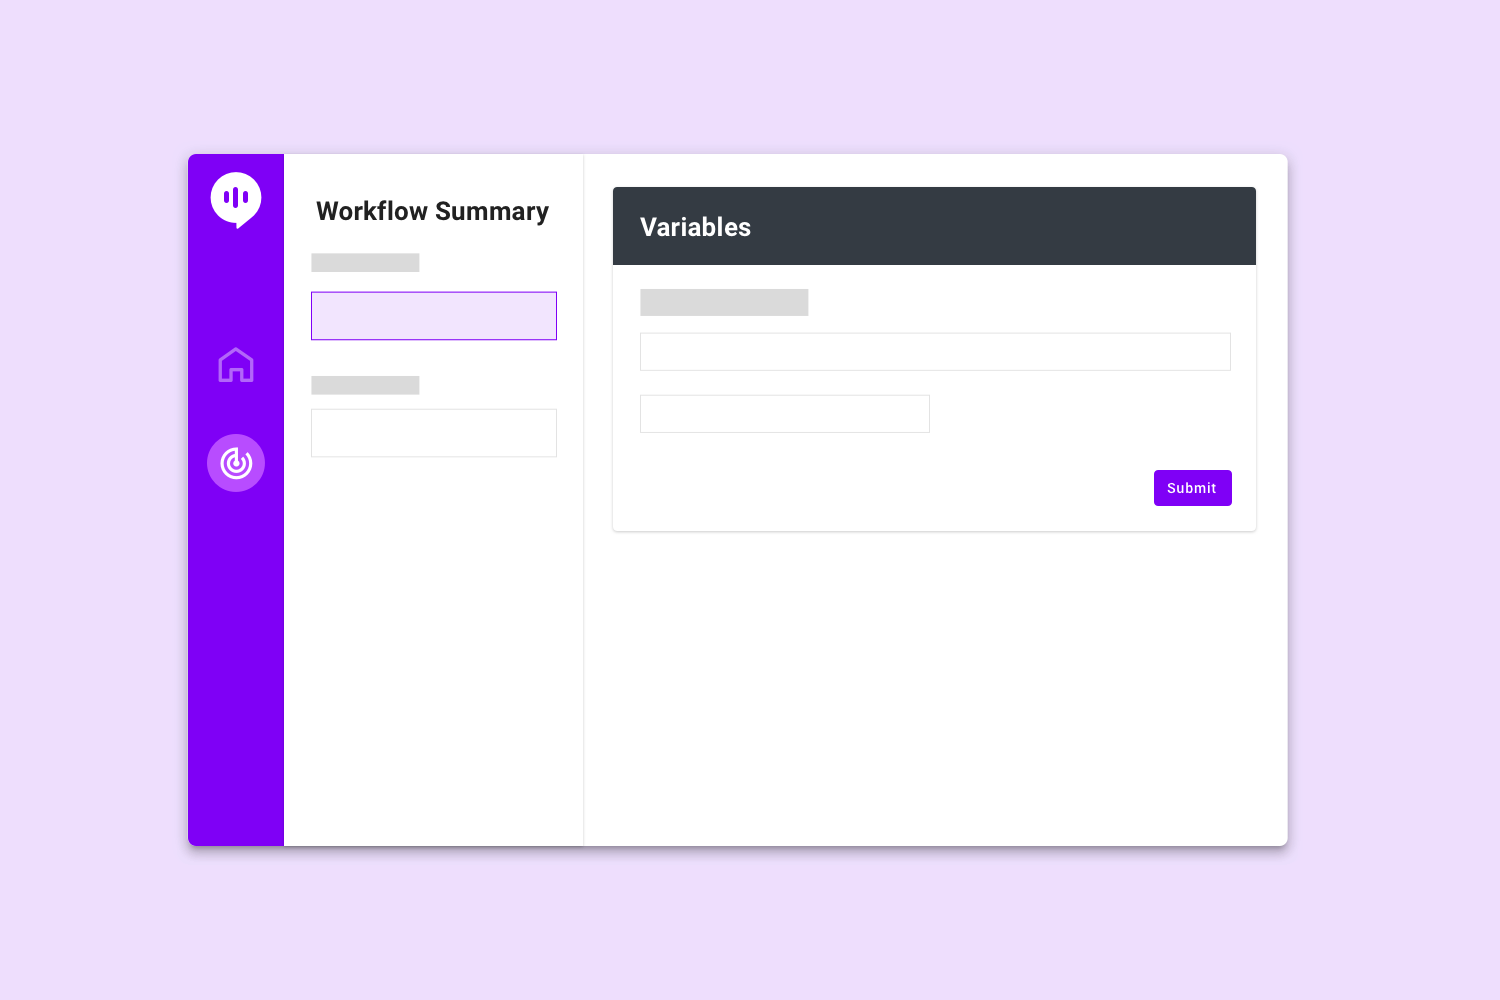
On the left is the workflow summary. Here you can find the trigger and every action of your workflow. You can reorder actions by clicking and dragging the ≡ icon up and down. Click on a trigger or action to edit the details. On the right side you can edit your trigger or action. The contents of this menu will depend on the type of trigger or action selected. Please refer to the corresponding section on triggers and actions below for further details.
For examples on how one might use Automation 2.0, please refer to the Example Workflows section at the bottom of this user guide.
Triggers
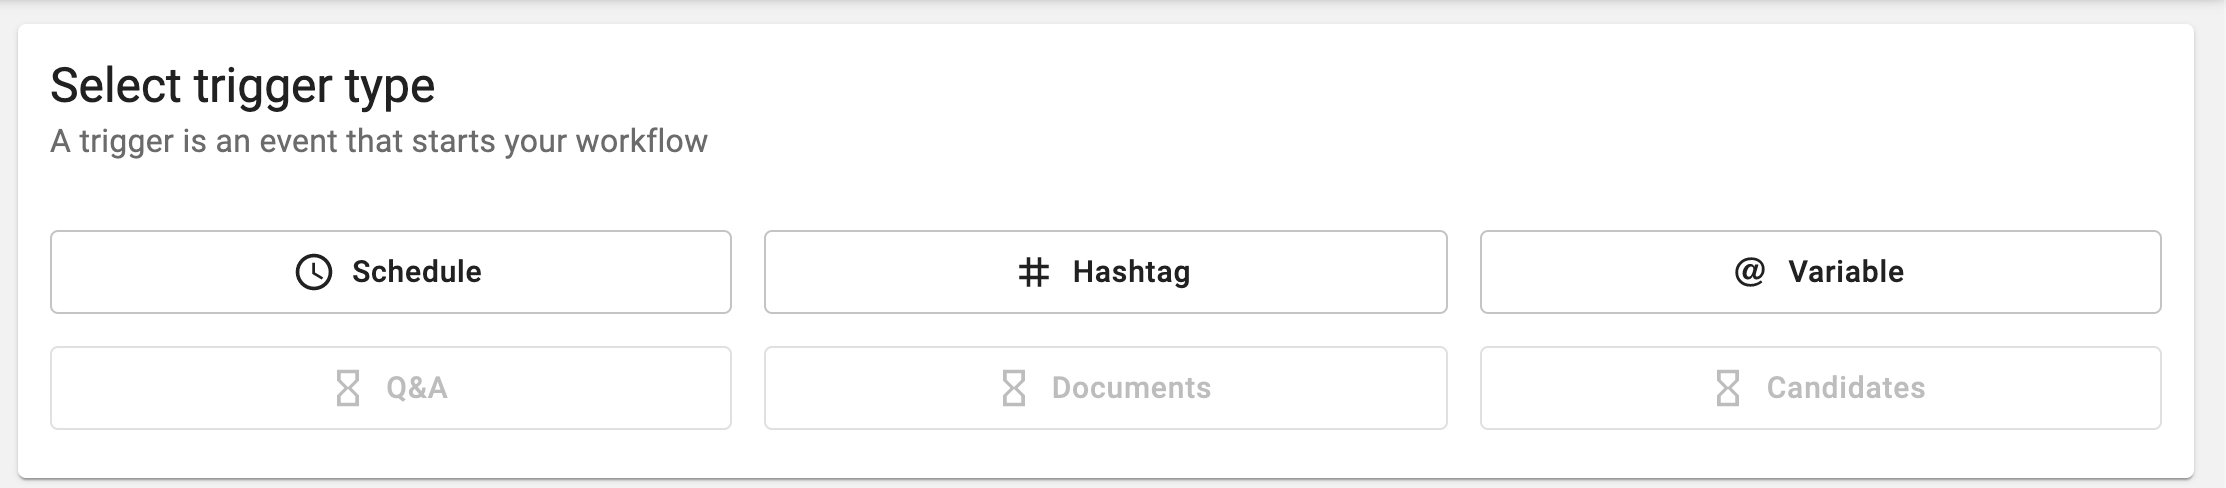
This section lists all triggers and describes how they work.
Schedule
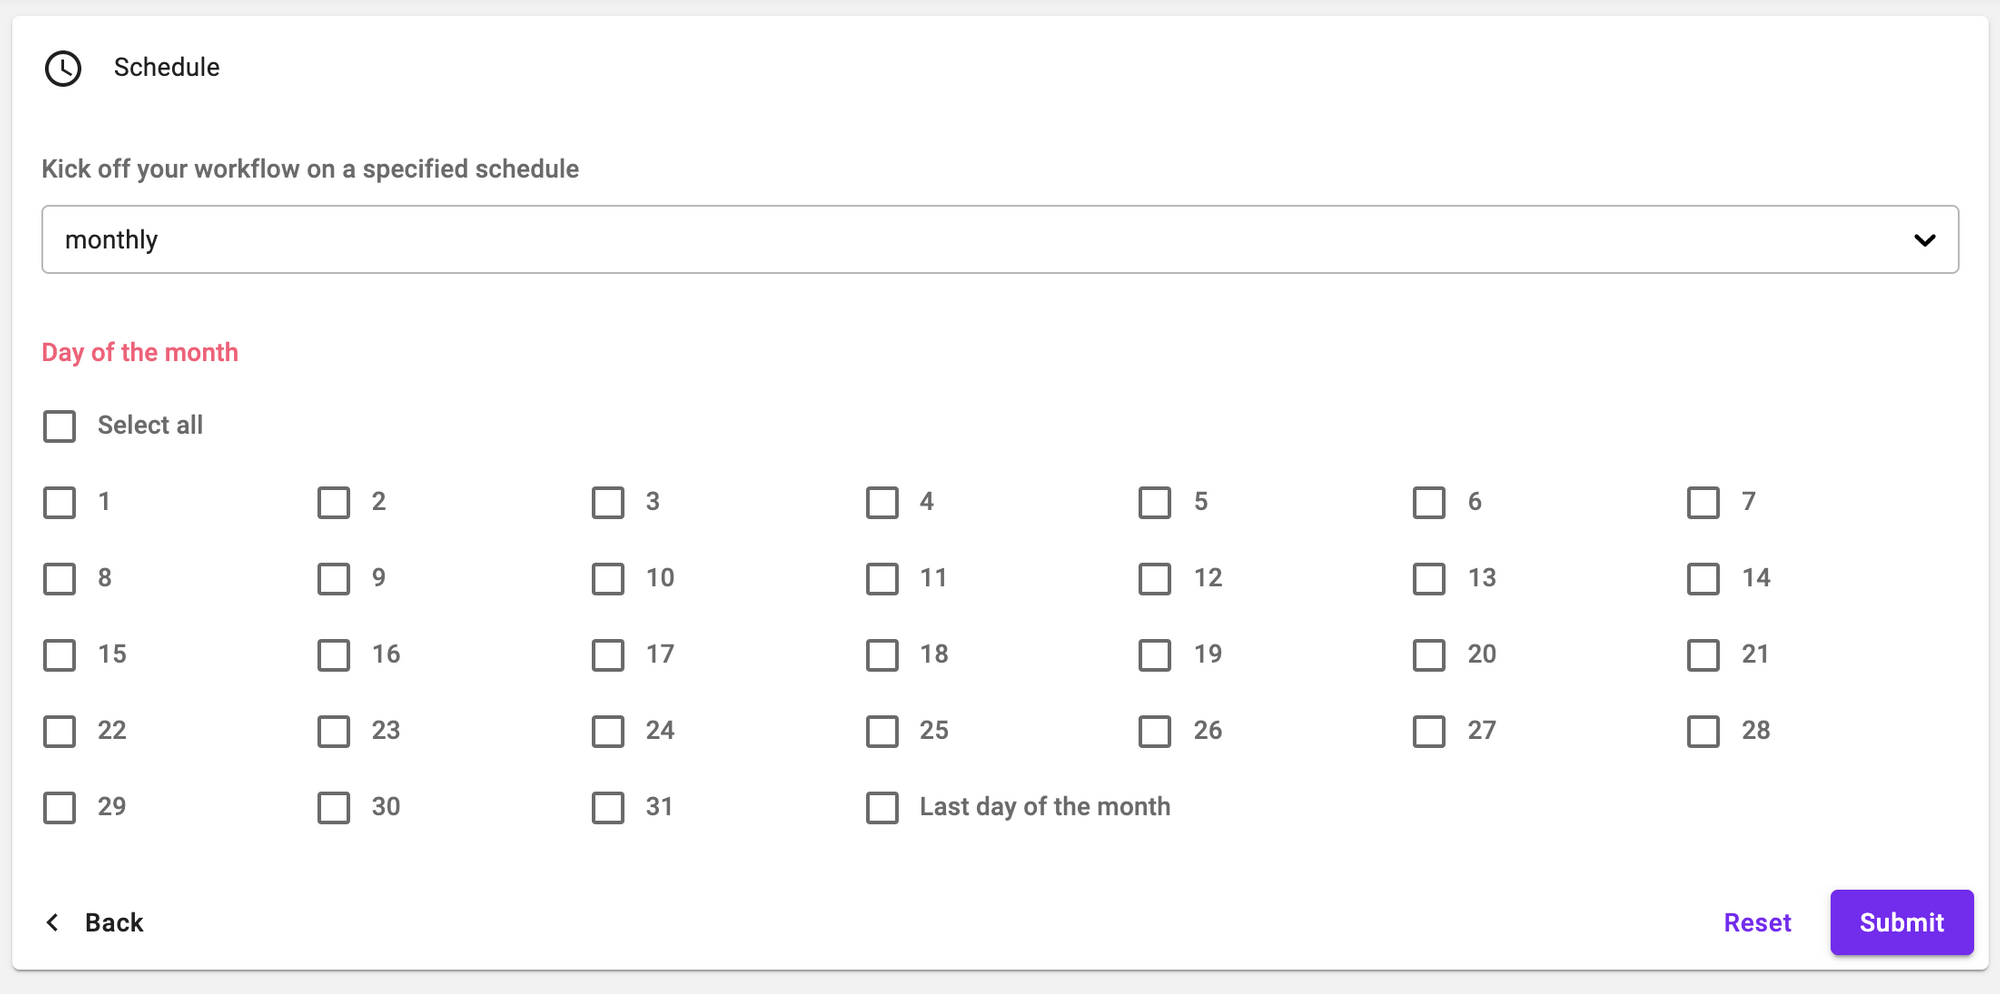
The Schedule triggers fires on a schedule. This can happen at a fixed time every day, on certain days of the week, or on certain days of the month. Weekly and monthly triggers (the latter two of the aforementioned three) fire at midnight on the day specified. The timezone is based on the project location and can be viewed under "Project Settings" > "General".
Note that if a monthly schedule is selected and the user selects the 31st day of the month, Schedule trigger will not fire in months without 31 days. (The same applies to the 30th in February and where otherwise appropriate.) Schedule trigger will fire if and only if one of the days of the month selected matches the current calendar day of the month. If you wish for schedule trigger to fire at the end of every month, please select the "Last day of the month" option.
Hashtag
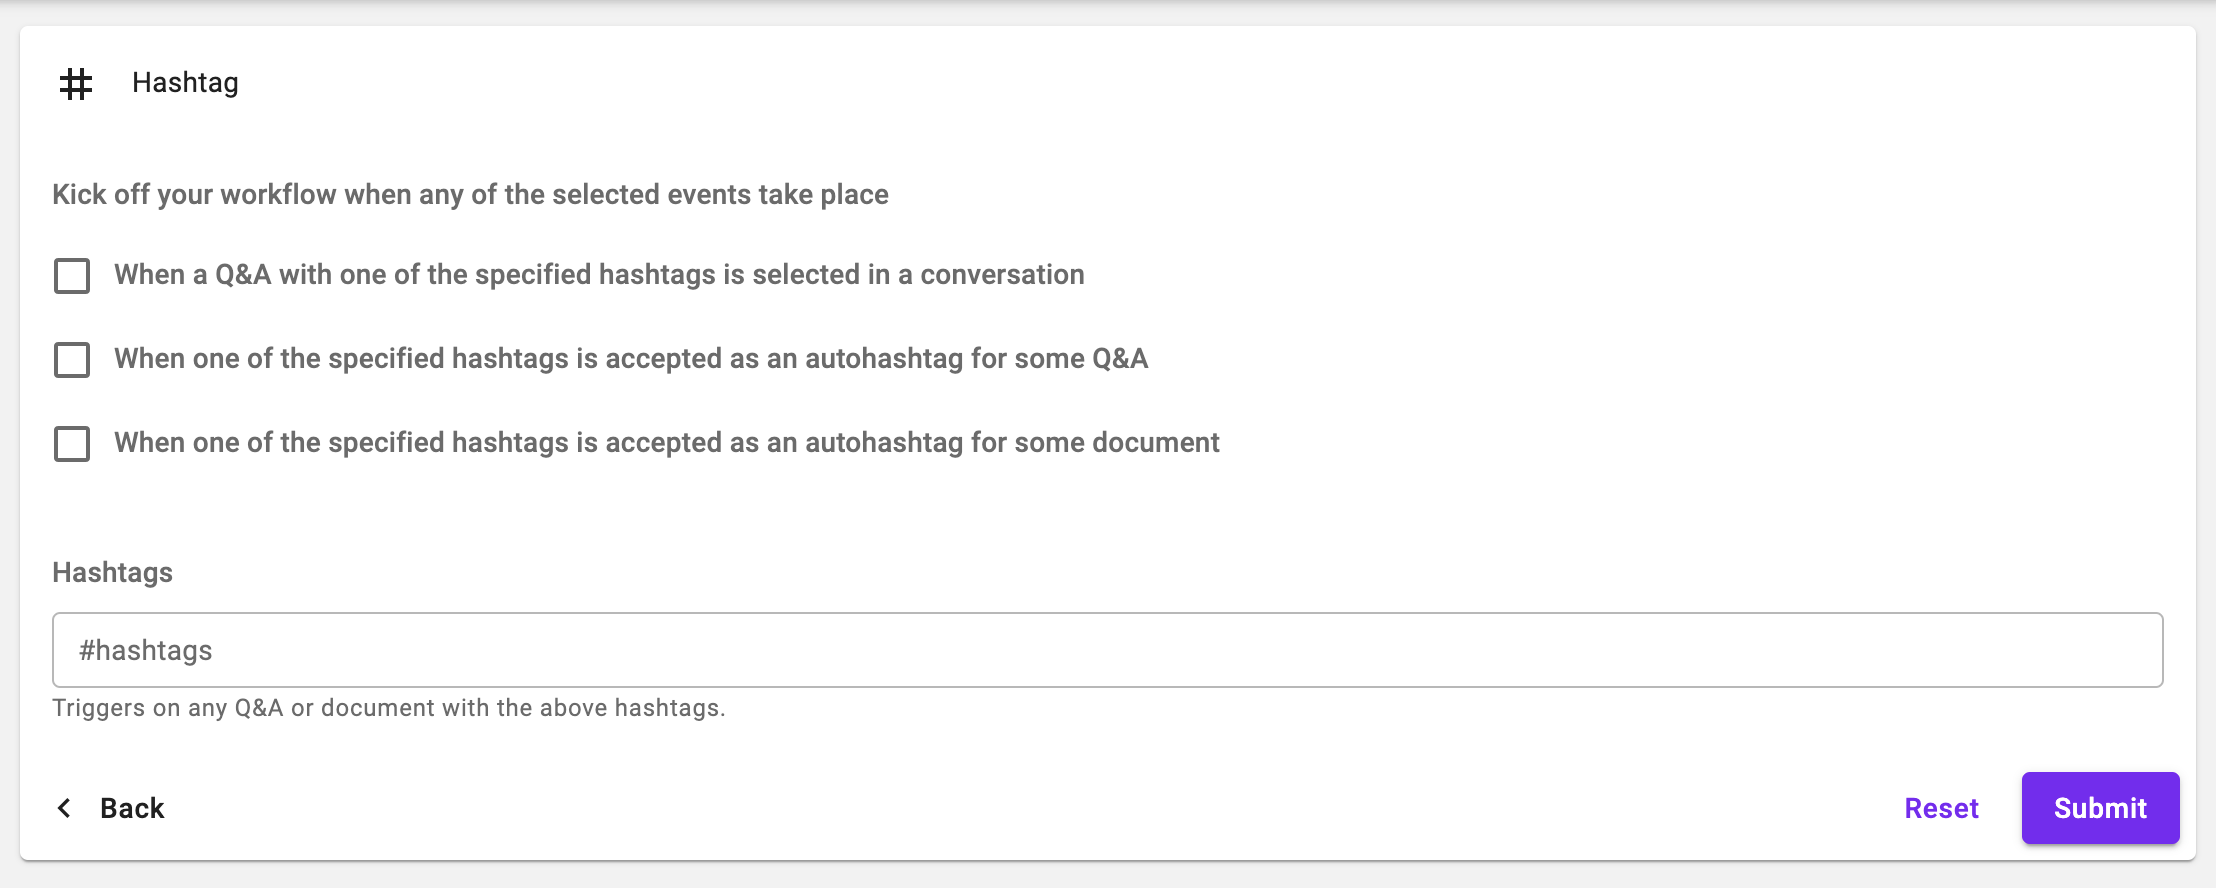
The Hashtag trigger is based on hashtags. It can be configured to fire when any of the specified hashtags are selected in a Q&A, accepted as an auto-hashtag for some Q&A, and/or accepted as an auto-hashtag for some Document.
Variable
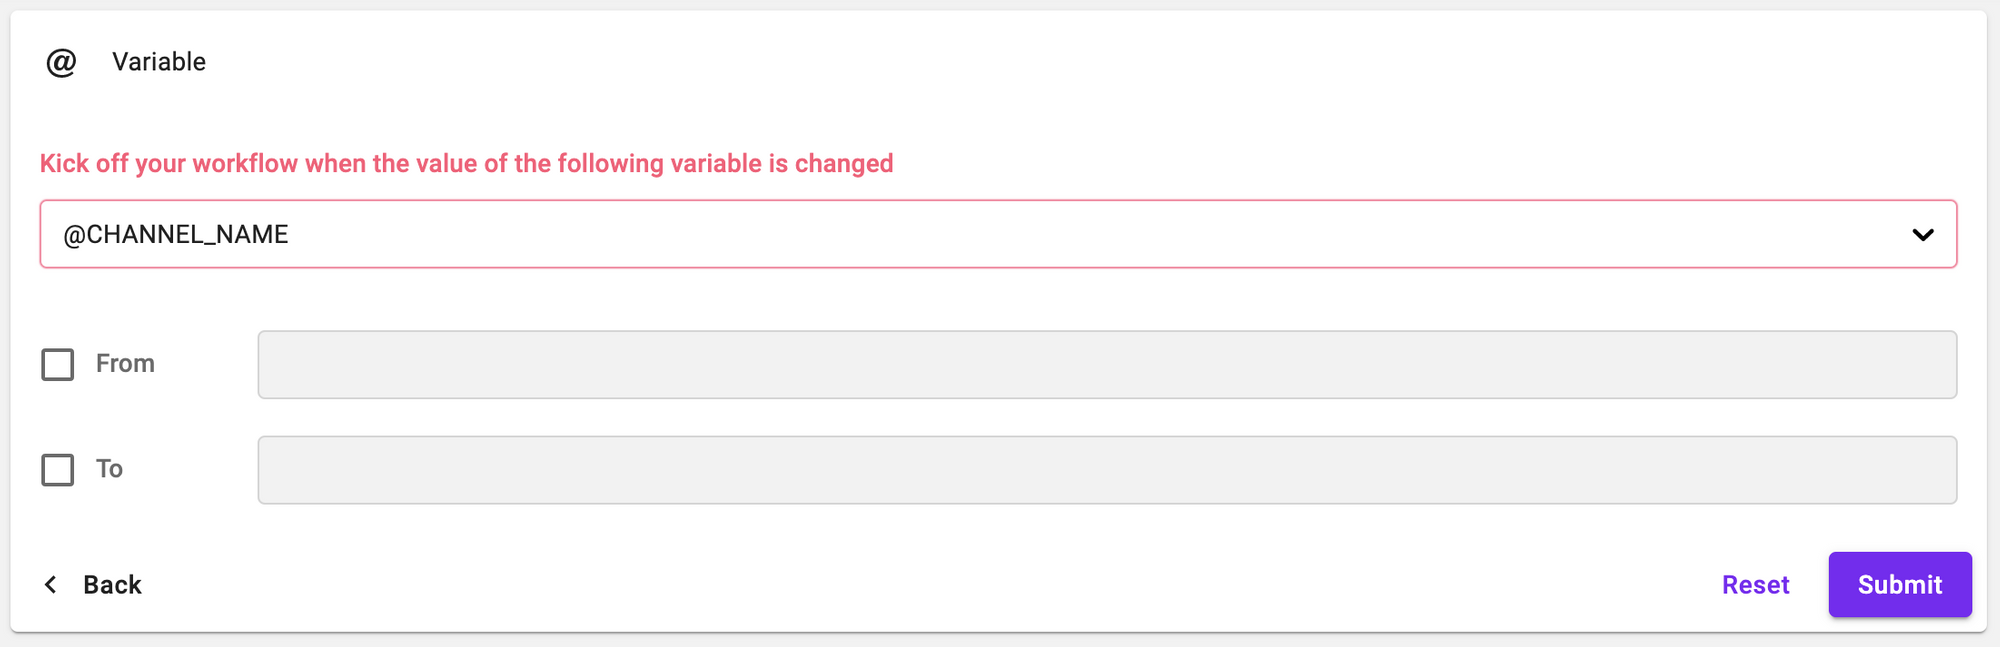
The Variable trigger fires when a specified variable is changed. Since only AnswerBot projects have customer variables, this trigger is only available to AnswerBot projects. It is not available to Cognitive Search projects. The Variable trigger can be configured to only fire when its specified variable is changed from and/or to a specific value. NOTE that certain variables like @CHANNEL and @CITY are system-defined variables and cannot be directly changed.
Actions

This section lists all actions and describes how they work.
Skill
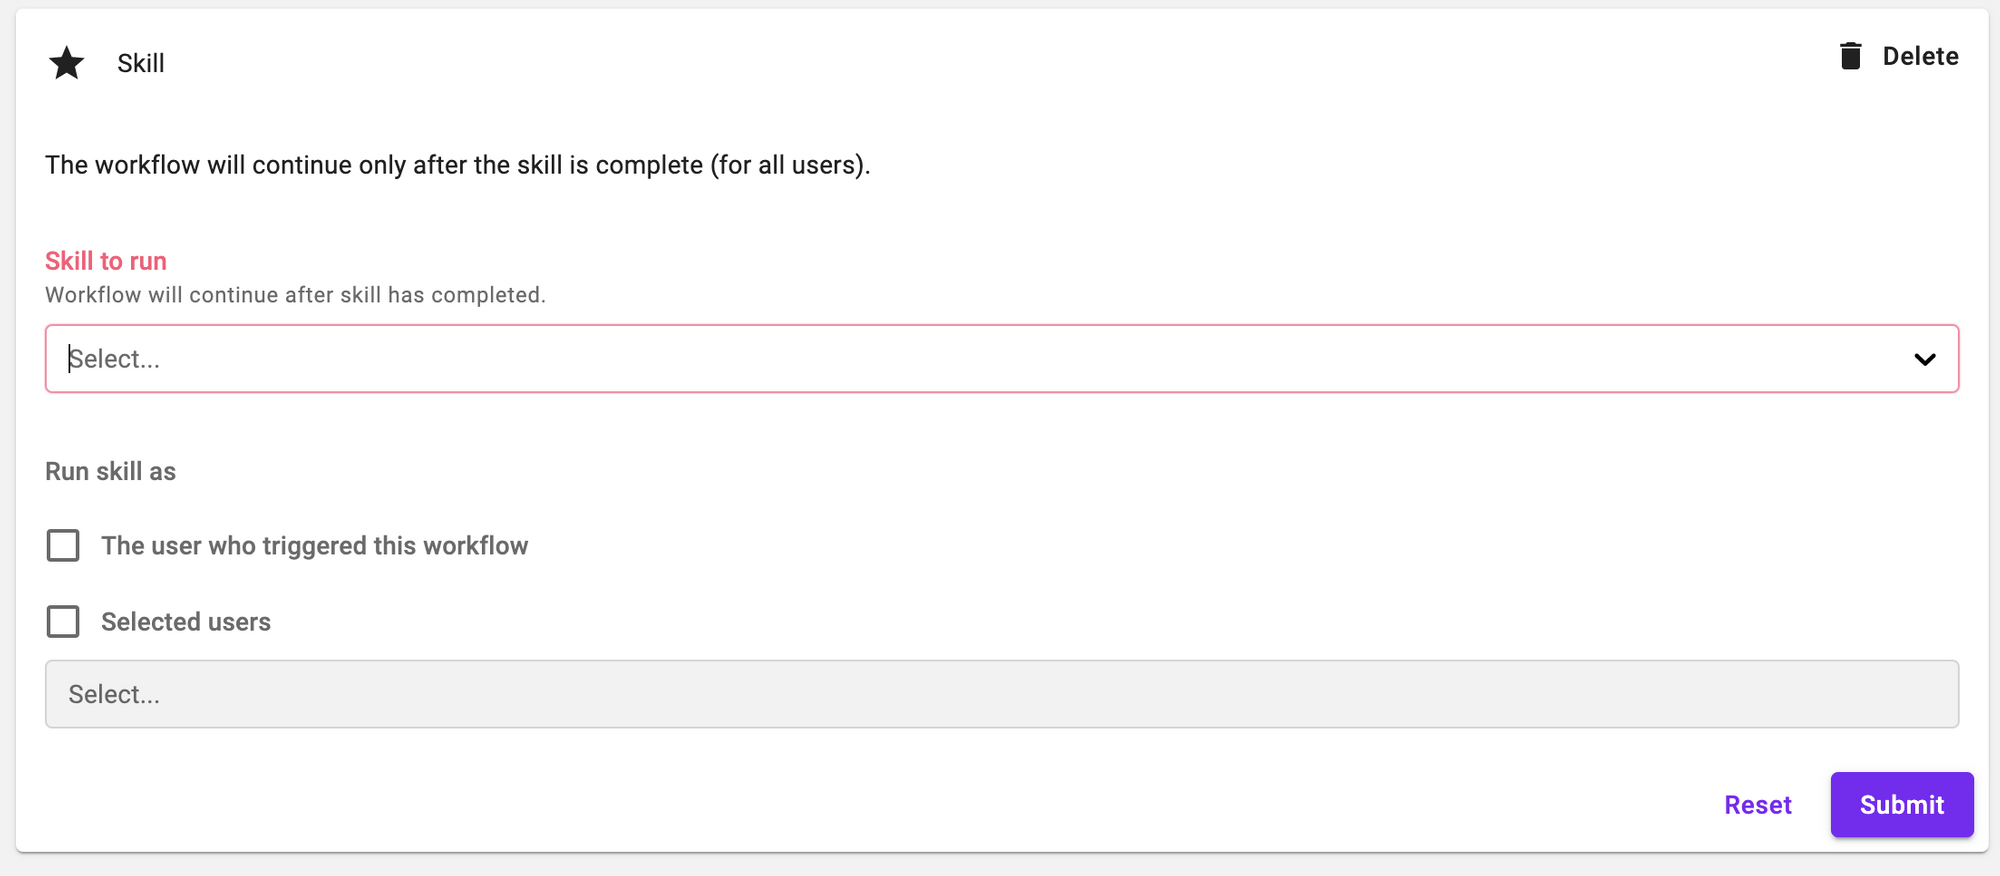
The Skill action runs a skill. Skills are Alli's AnswerBot routines Since skills are only available to AnswerBot projects, the Skill action is also similarly only available to AnswerBot projects. Once running, Skill actions behave very similarly to Observer skill. For help building your skills, please refer to the Skill editor user guide.
- Skill to run - The skill to run. Note that the skill must be turned on in order for Skill action to execute.
- Run skill as the user who triggered this workflow - the skill will be run for the user applicable to the trigger. If the trigger type is Variable, then "the user who triggered this workflow" would refer to the user who caused a variable change. If no user triggered the workflow (e.g. Variable was changed by an agent in the Alli dashboard), then this option is disregarded,
- Run skill as selected users - the skill will be run for all selected users.
Both of the "Run skill as" options are selected and a user is both the user who triggered this workflow and one of the selected users, then the skill will only be sent once to the user, and not twice.
Here are the technical details of Skill action. Subsequent actions in the same workflow will only continue after the Skill completes and exits for all specified users. This means that if your skill never finishes the workflow will not continue.
Running a Skill action on a user will interrupt their most recent open conversation with the specified skill (ignoring any conversations with agents). If there are no conversations to interrupt then Skill action will open a new conversation. Once the skill completes, the conversation will return to where the user previously left off, repeating the most recent message. If the interrupting skill never finishes, then Alli will never return to the user's previous conversation. For this and the previously mentioned reason, it is highly recommended to avoid using skills with infinite loops with Skill action.
It is possible to interrupt an interrupting Skill action with another Skill action (from a separate workflow) or with an Observer skill. NOTE that the following explanation is very technical and isn’t necessary for most users. If you’re having trouble with Skill actions interrupting each other we recommend (if possible), you simplify your workflows so they operate independently. In any case, the interruptions behave similarly to a stack, which can be thought of as a deck of cards. Initially our deck consists only of one card, which corresponds the current skill running. When this skill is interrupted, the new skill stacks on top of the deck as a new card. When the interrupting skill completes, Alli will remove the card from the top of the deck and resume execution of the next topmost card, which is the last skill interrupted. Put different, interruptions work on a last-in, first-out principle, the last skill that was interrupted is the first one to resume execution. For example, if skill B is interrupting skill A and skill C interrupts skill B, our “deck” looks like (from top to bottom) C-B-A. Then once skill C finishes it is removed from the deck and the most recent, next topmost skill (which would be skill B) would continue execution.
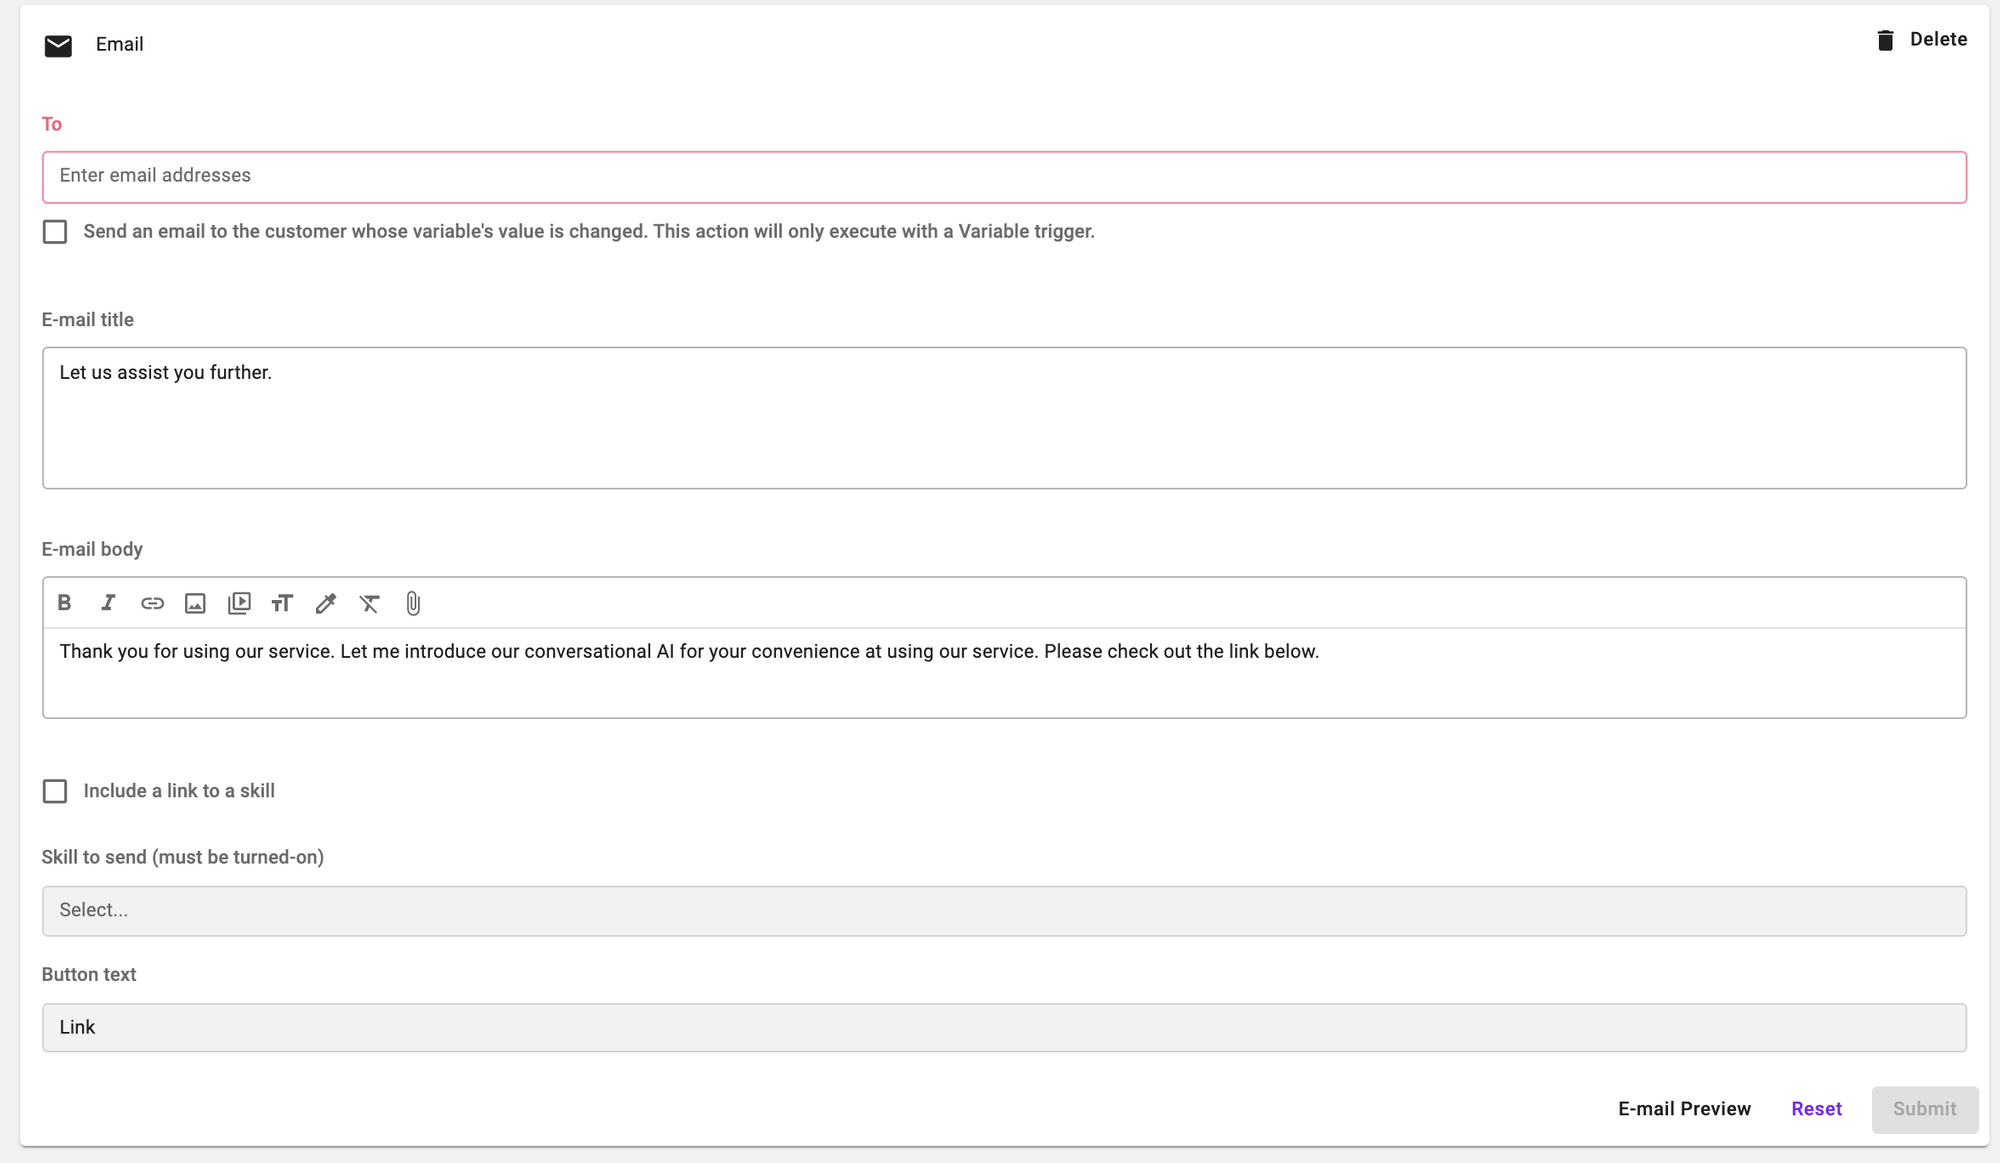
The Email action replicates the functionality of Automation 1.0, sending out a customized email. Here is an overview of all of the fields.
- To - The recipients for the email being sent out.
- Send an email to the customer whose variable's value is changed. This action will only execute with a Variable trigger.* - Send an email to the address stored in the @EMAIL variable of the customer whose variable was changed.
- E-mail title - The title or subject of the email being sent out. In AnswerBot projects, you can reference variables with the syntax @VARIABLE_NAME.
- E-mail body - The body of the email being sent out. In AnswerBot projects, you can reference variables with the syntax @VARIABLE_NAME.
- Include a link to a skill* - Whether or not to include a link to a skill in the email.
- Skill to send (must be turned-on)* - The skill to send in the email.
- Button text* - The text to place on the button which links to the skill sent in the email.
* - Fields marked with an asterisk are only available in AnswerBot projects and not in Cognitive Search projects.
Example Workflows
Remind users of updated PTO policy
Let's assume you use Alli as an internal help desk. You have a new PTO policy and want to remind your employees. You've sent out an internal memo but sometimes still have employees getting them mixed up. Sending out another memo might work, but maybe we there's a way we can target the information to the confused employees. Here's how Automation 2.0 can help. We will use the Hashtag trigger and a Skill action to send out a skill reminding employees of the new PTO policy when a related question is asked.
The first step is to go through your Q&A bank and flag any PTO-/leave-related questions with a hashtag. I'll use the #vacation hashtag in this example, but any hashtag name will do. If you're making a new Q&A, don't forget to turn it on!
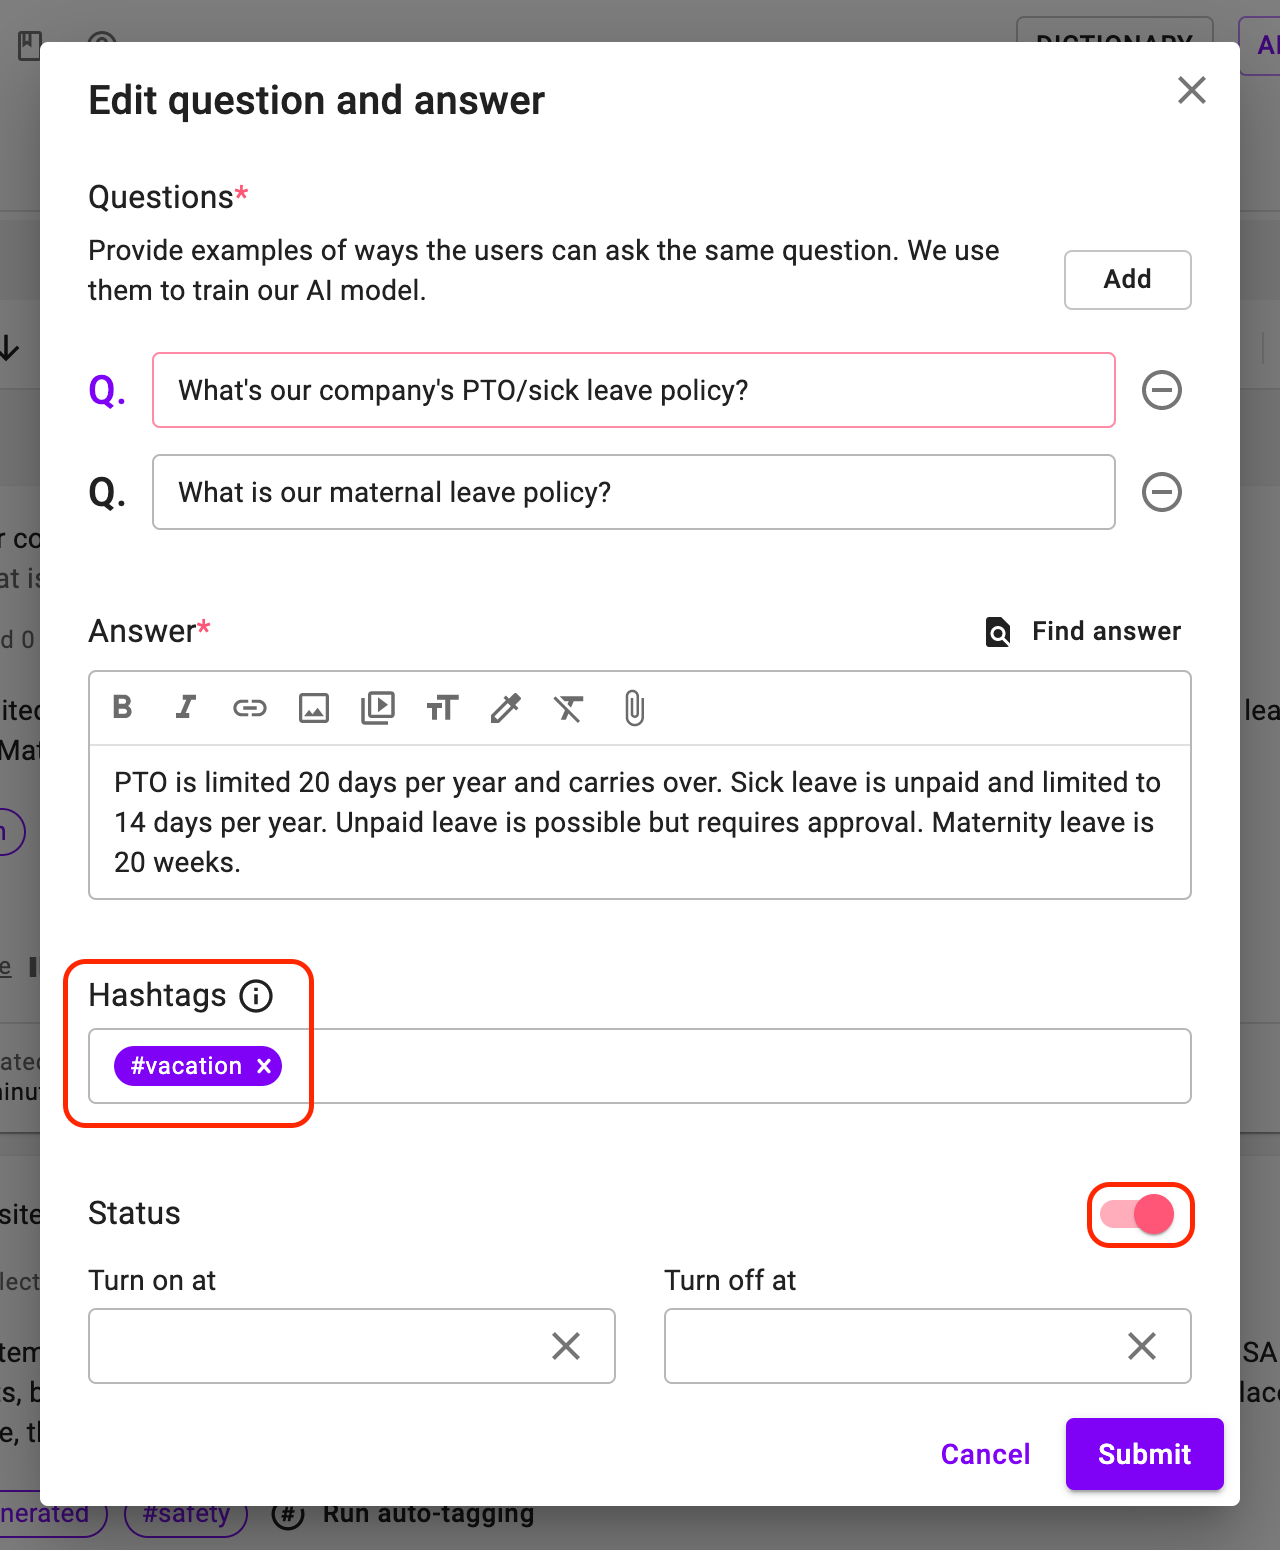
As an aside adding hashtags to all of your Q&A's might be a good idea (depending on your individual use case).
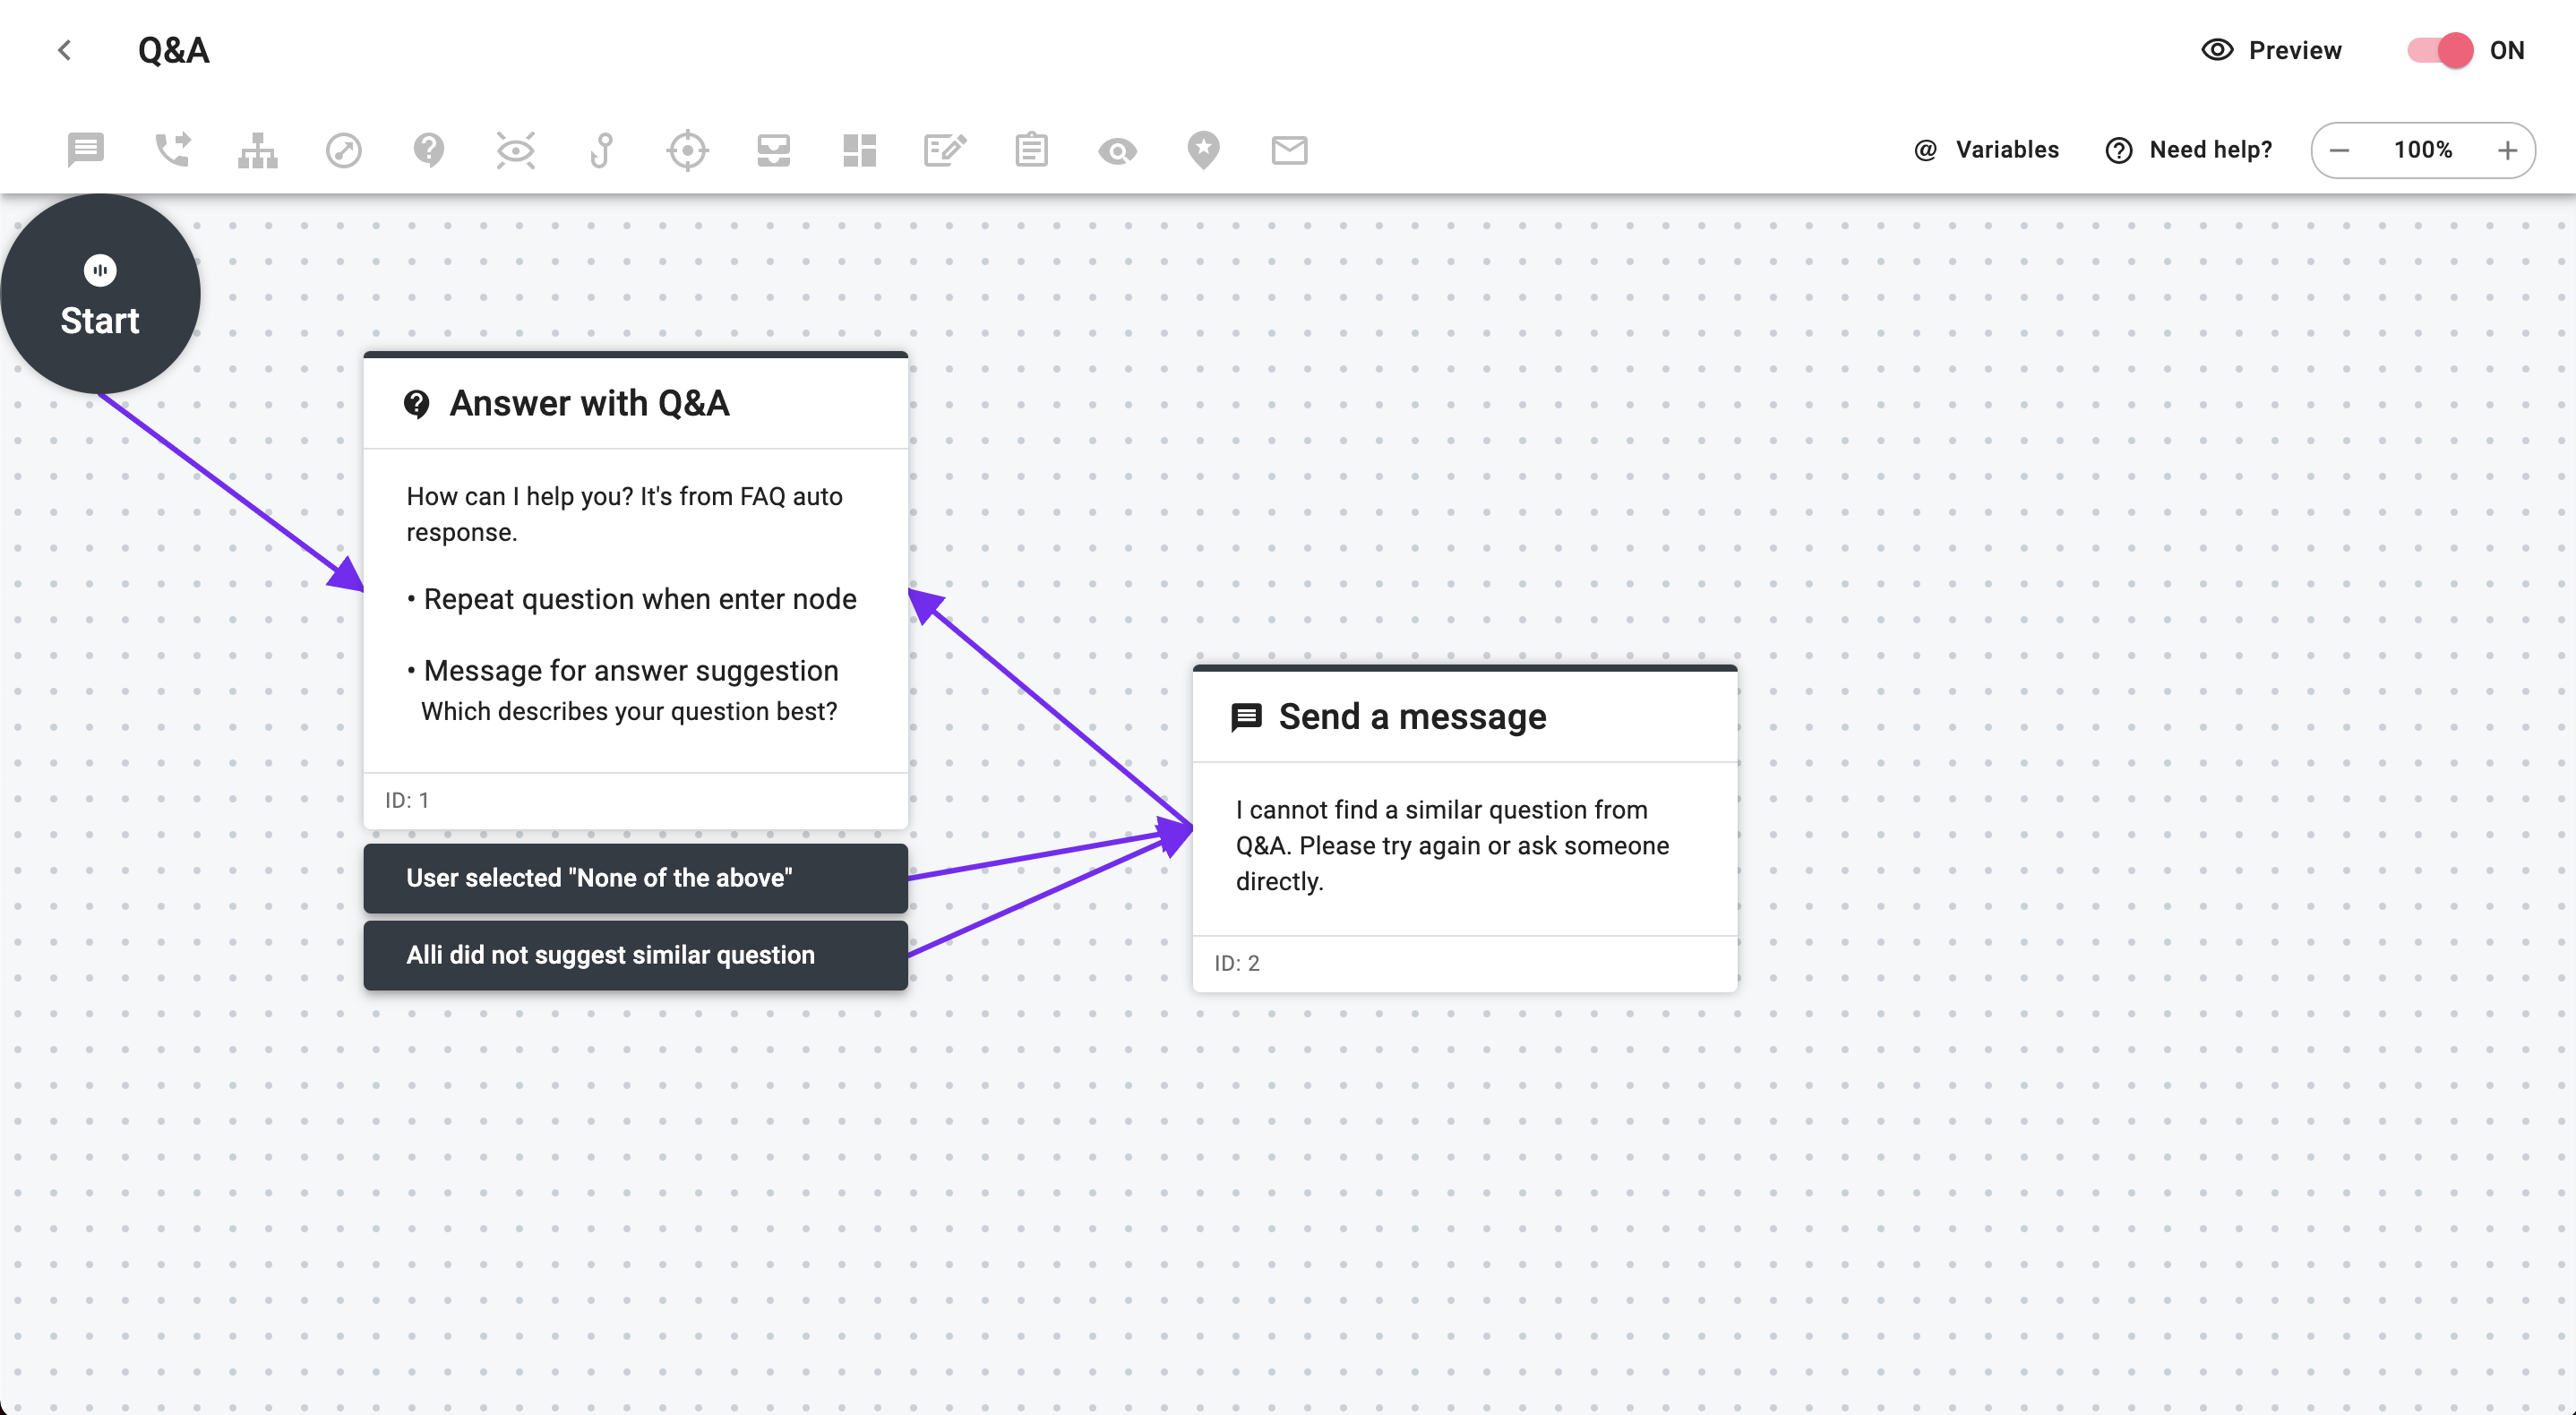
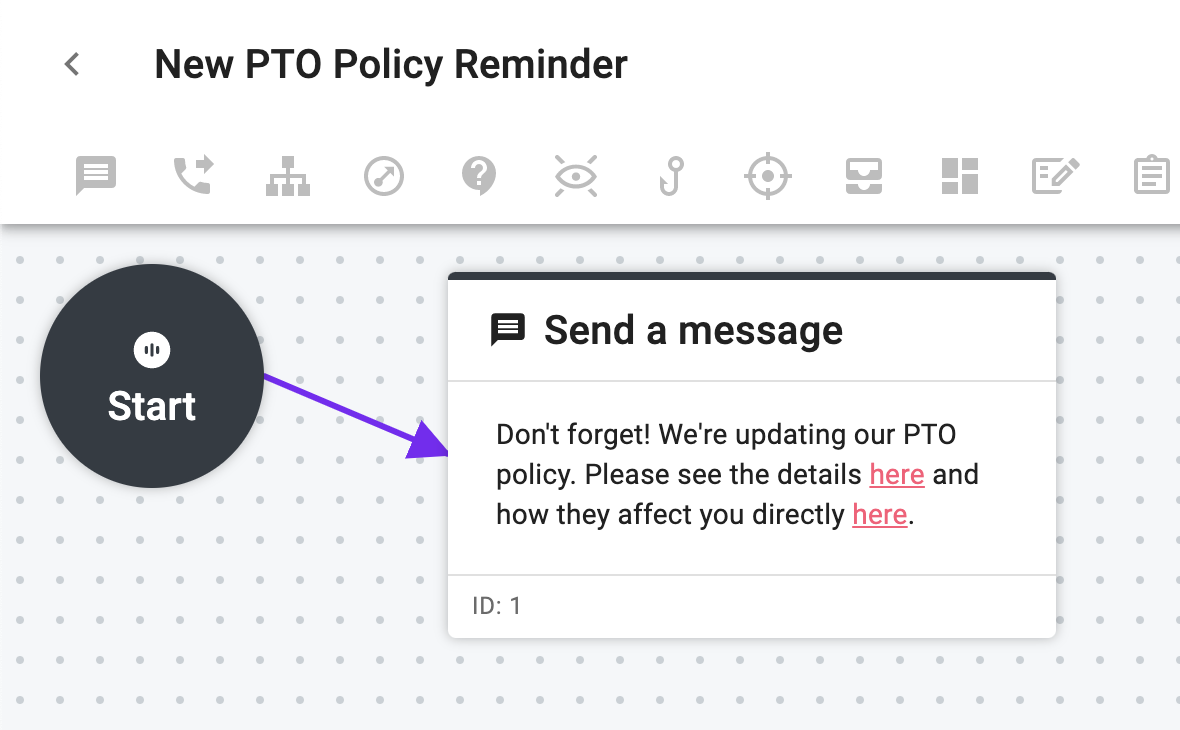
This scenario also assumes you are using Alli as an internal help desk, meaning that you have a skill set up to answer questions. The skill itself is very simple: simply add an "Answer with Q&A" node, add an error message like the one displayed, and connect the lines as shown below. For further help with our skill editor, please refer to the Skill editor user guide.
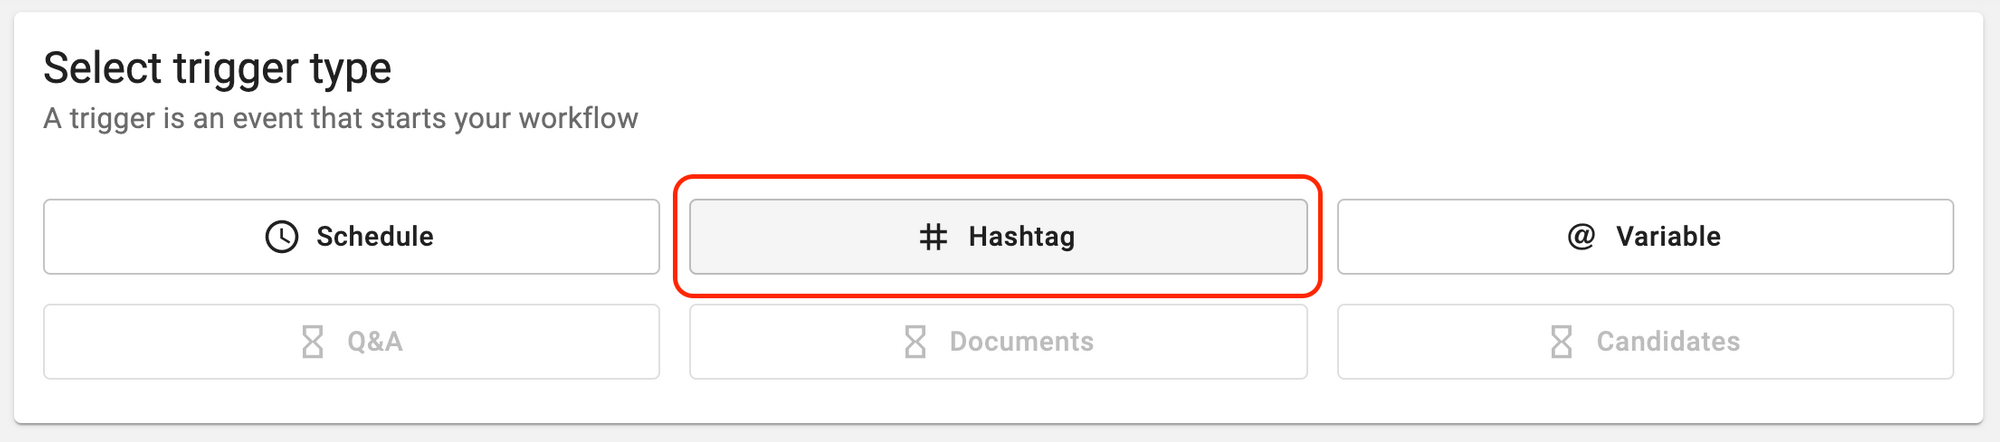
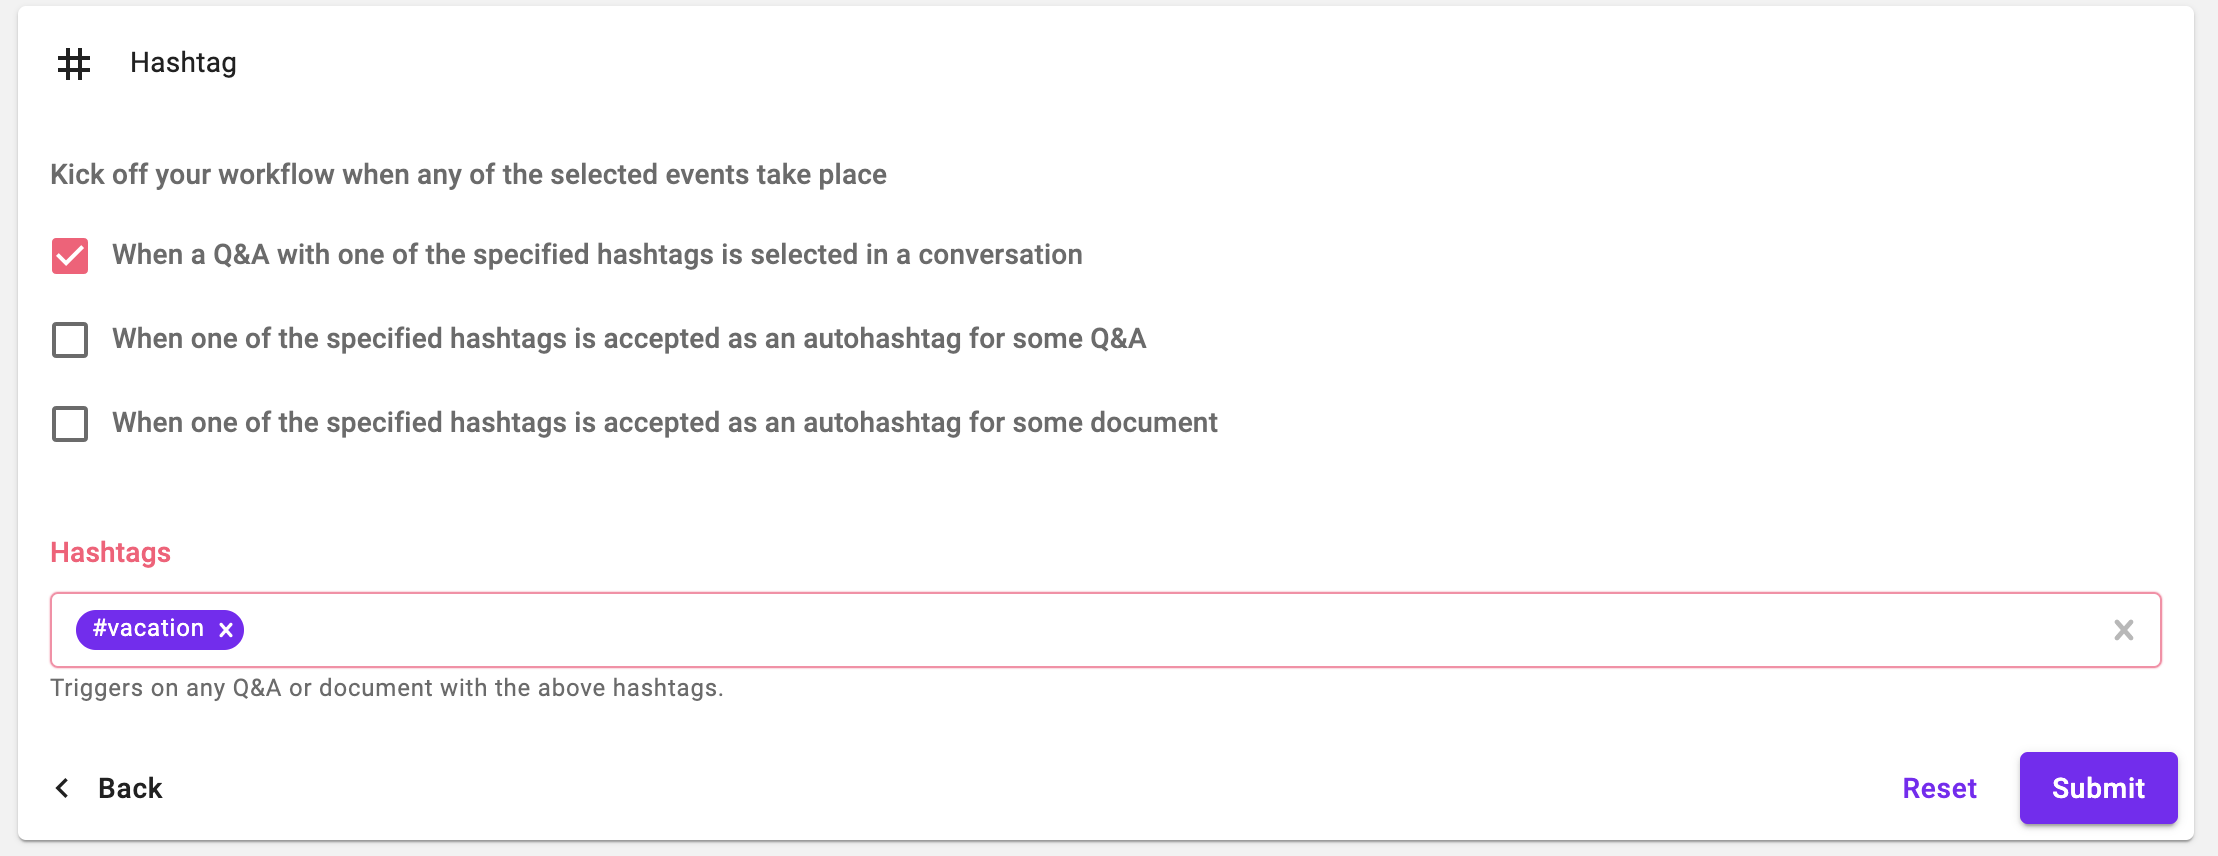
Here comes the new part. As mentioned previously, we want to use a Hashtag trigger to send a skill whenever a #vacation Q&A is selected. Thus we want to select #vacation as our designated hashtag and tick the "When a Q&A with one of the specified hashtags is selected in a conversation" checkbox. Click "Submit" to save.
Next to add our action. Again, we want a Skill action to send out basic information. That means we'll need a skill! All our skill needs to do is send a message, so our layout will be pretty simple. Don't forget to turn it on once it's ready and drag it below your help desk skill your normal help desk isn't replaced with the PTO message skill.
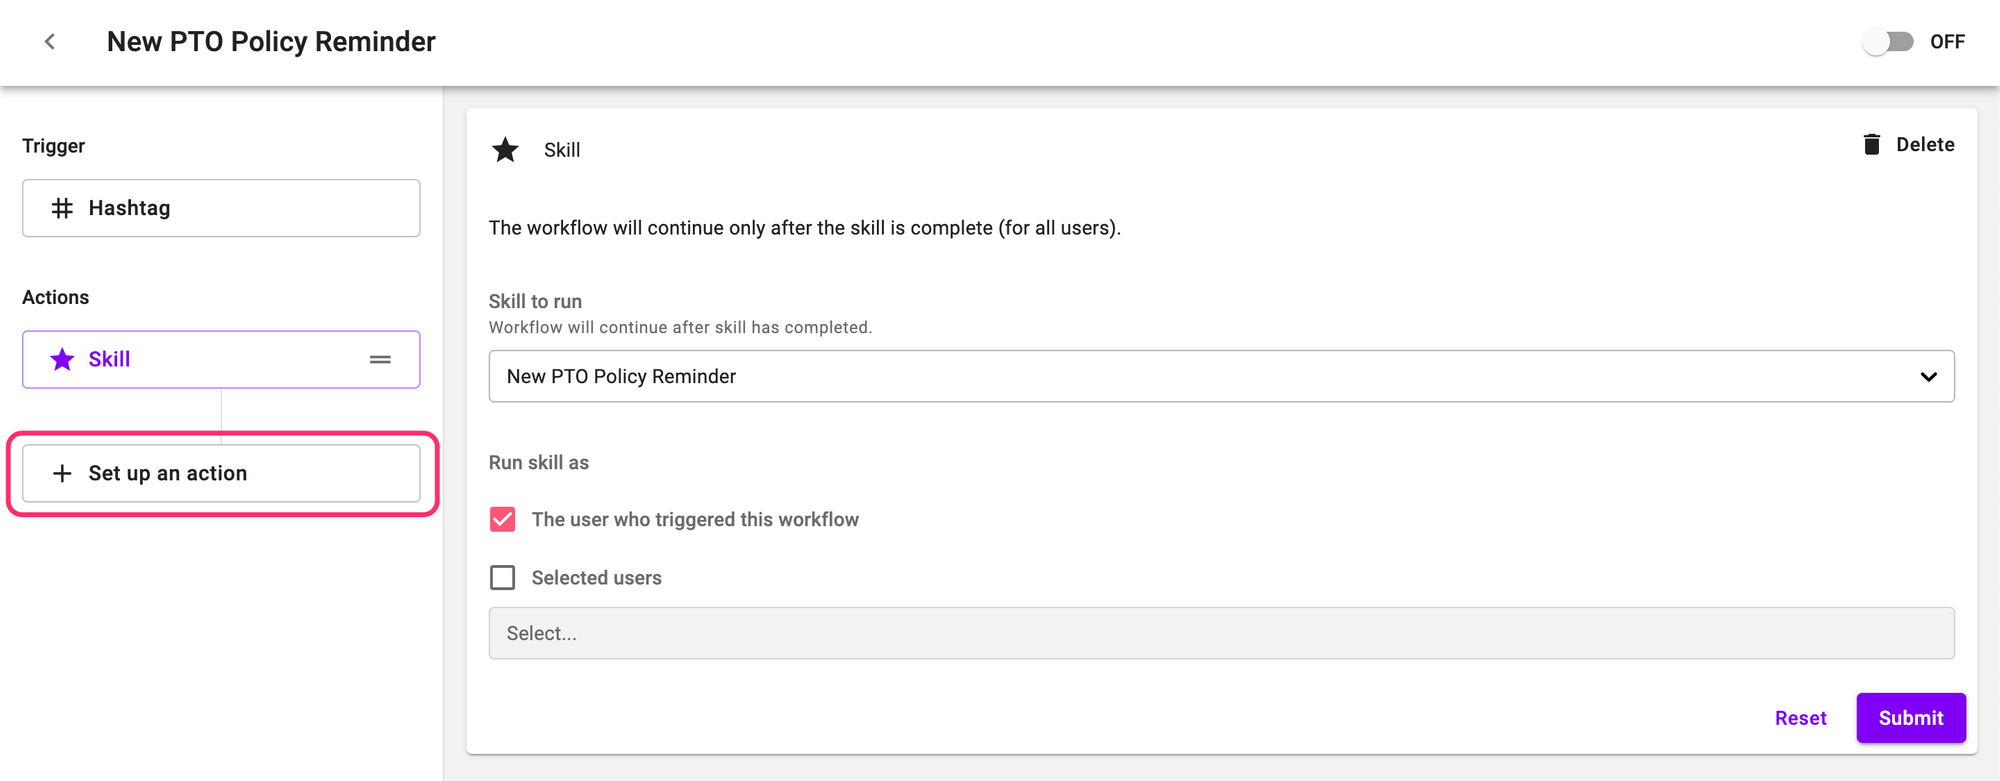
Then, to set up the Skill action, navigate back to your workflow and click "Set up an action" on the left and select the "Skill" action button. Select your new skill, check the "The user who triggered this workflow" button (this will make the skill run for the user who selected the question), and hit "Submit" to save. Don't forget to turn on your workflow in the top right!
Test it out to make sure everything works, and you're good to go!
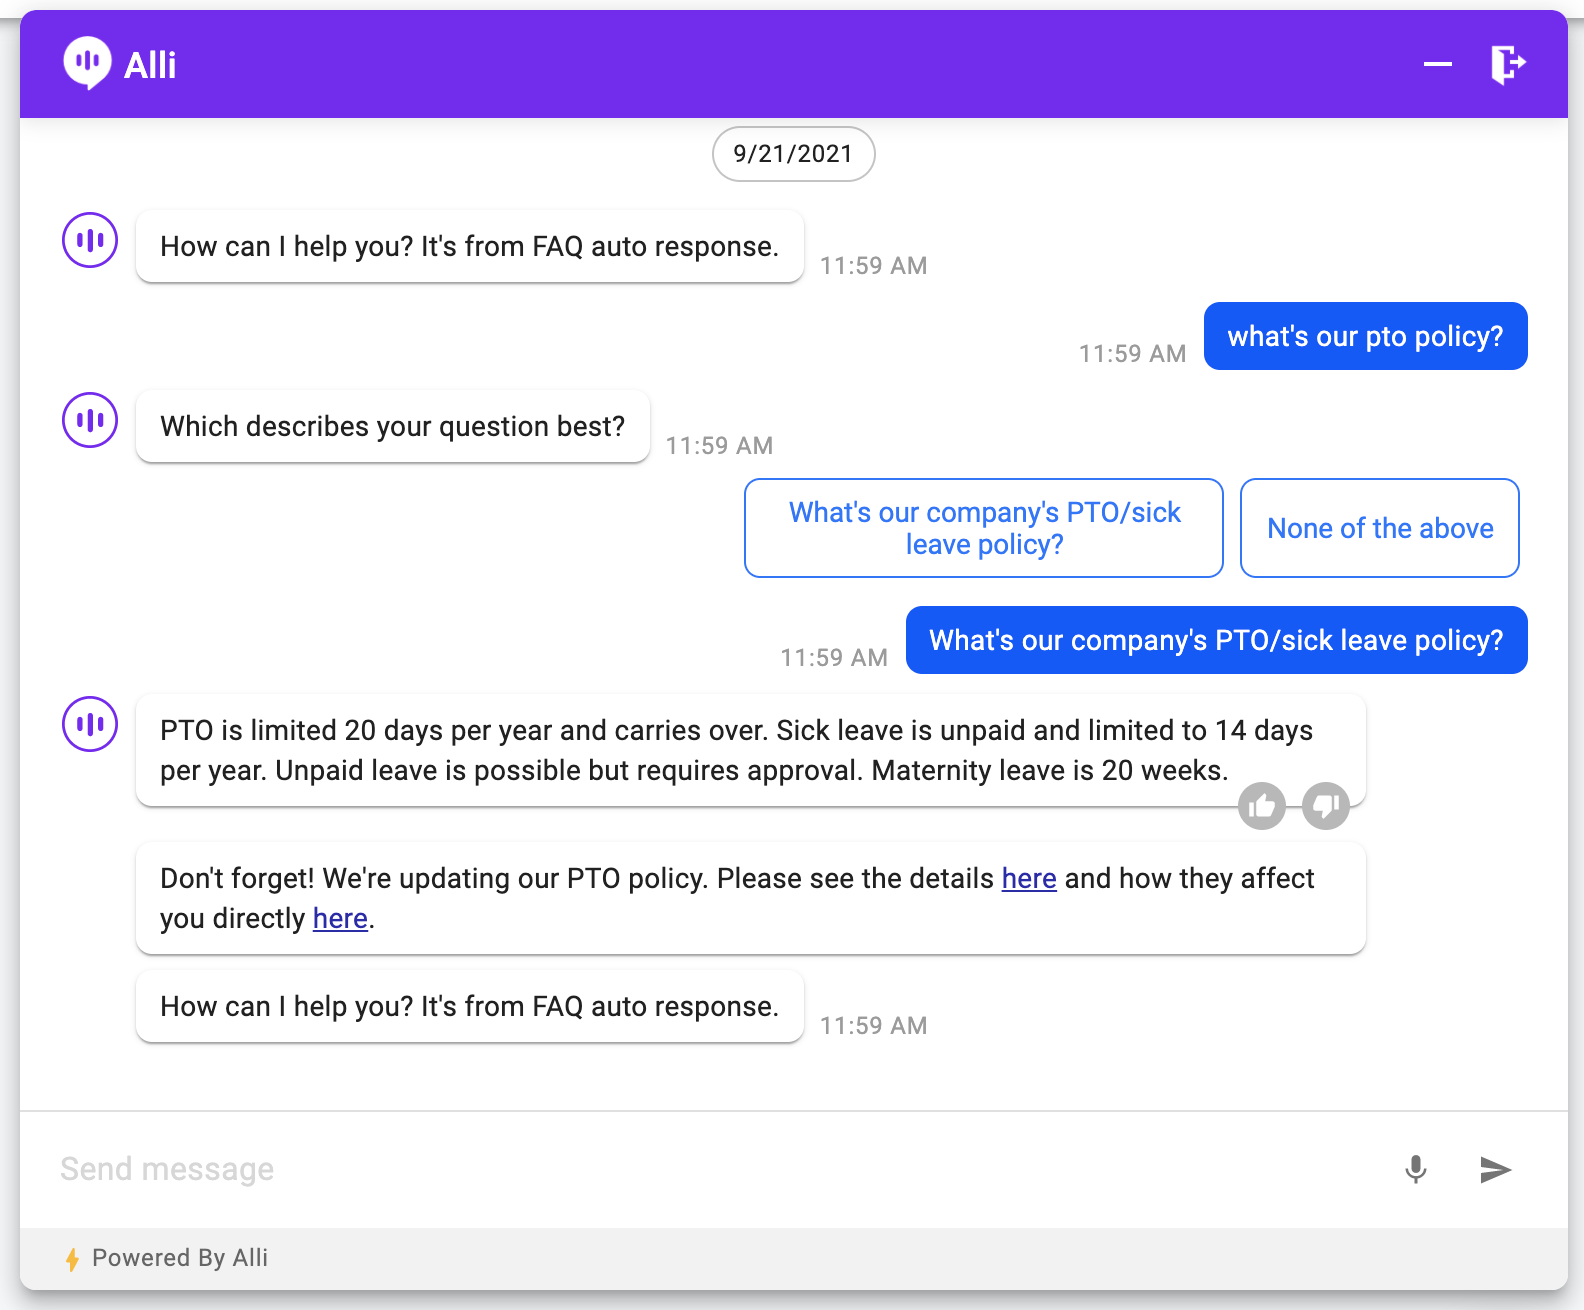
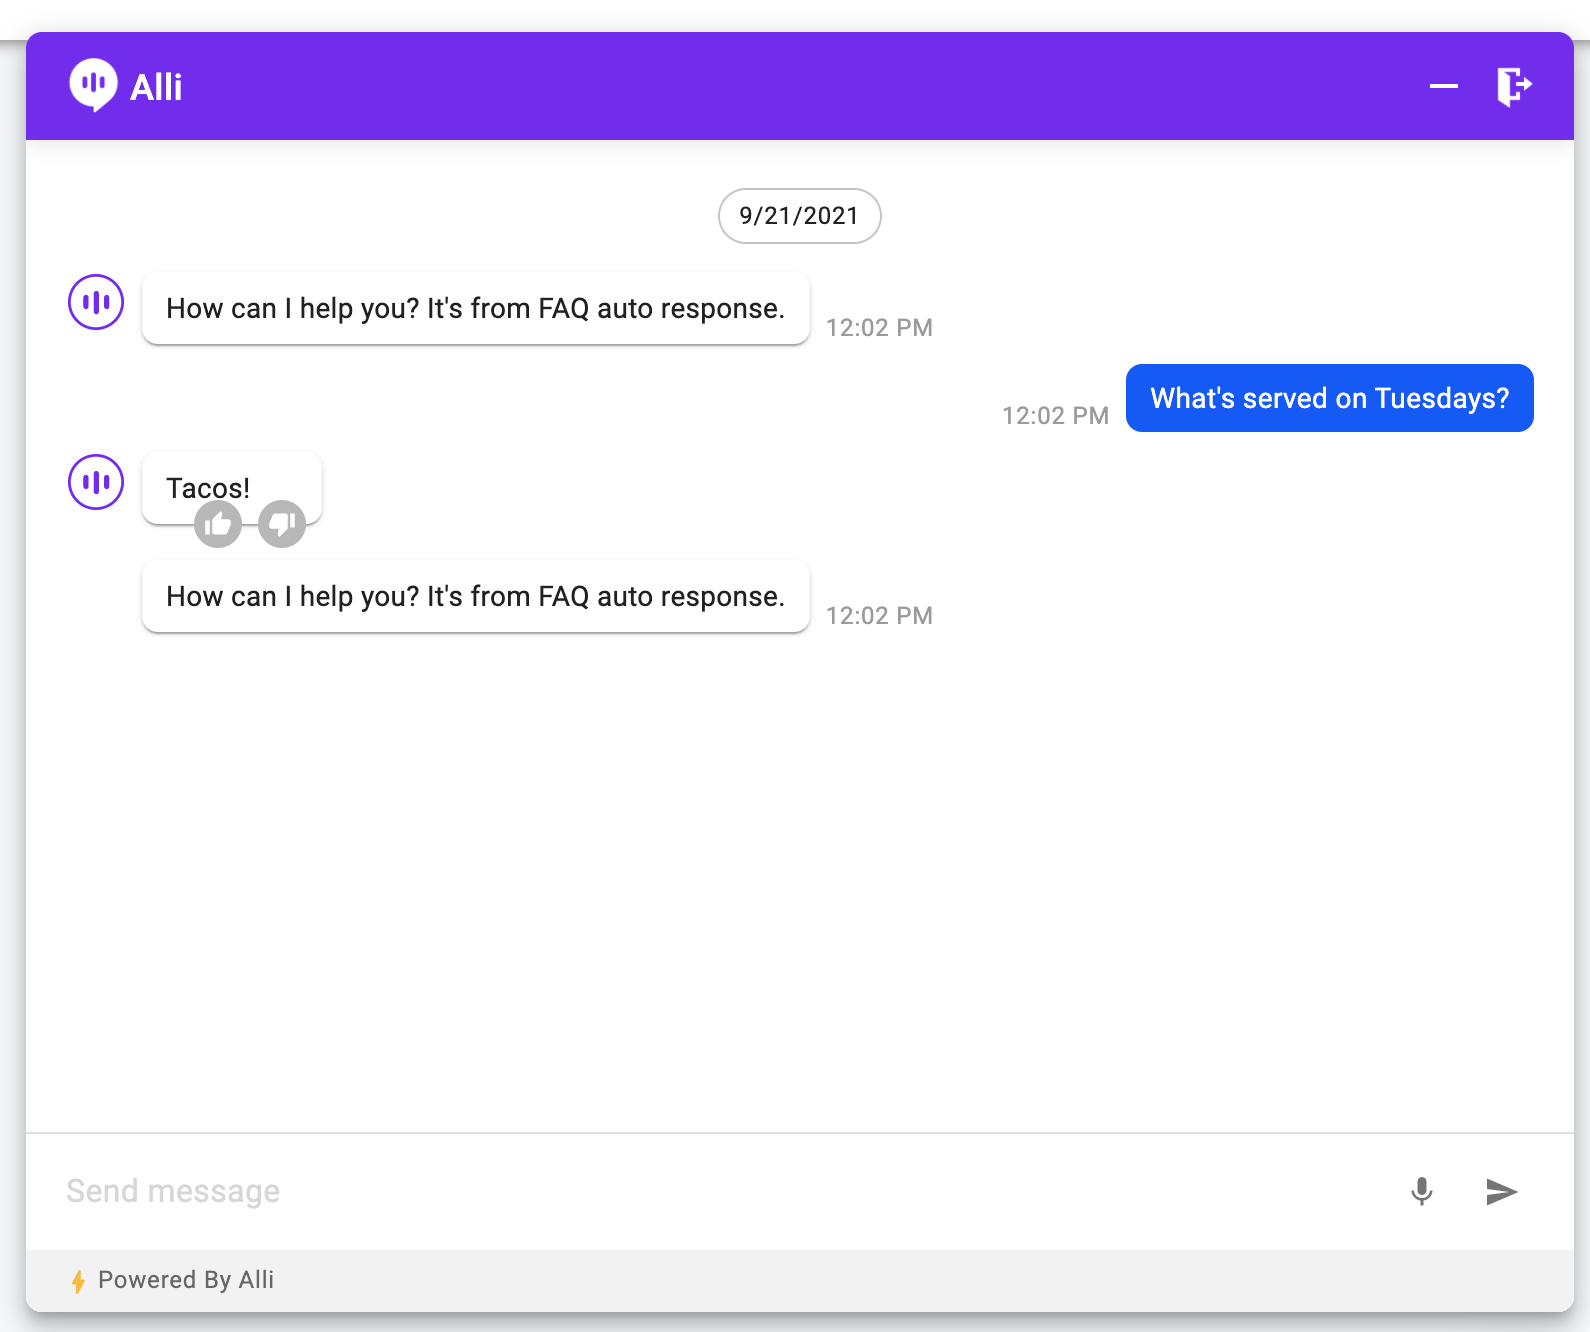
Just to confirm, you can ask an unrelated question to make sure the reminder is only being sent out when appropriate.
That's all there is to it!
Monthly Reminder Emails
Let us run through a simple example to see how Automation 2.0 can help automate your workflows. Let's suppose you are an insurance agent who manages insurance policies with monthly premiums. Manually sending out reminder emails every month might be feasible when just starting out, but as your practice grows and you have more things to worry about this quickly becomes untenable. Rather than stopping the monthly reminder emails (which customers might not like) or pawning the task off to a secretary or intern, you can use Automation 2.0 to automate this task.
Our simple workflow will consist of a Schedule trigger – configured to fire monthly – and an Email action targeted at all clients with active policies. F0r the Schedule trigger, select "monthly:, and pick whatever day of the month works best for you. For my example, I chose the first of every month.

Next add an Email action, enter your clients' emails, and fill out the subject and body fields appropriately. Since this is a simple monthly reminder sent to a fixed audience, we will disable the Skill-related options.

Once you turn the skill on, you'll be good to go! If you want to test to make sure that the emails are properly being sent, you can modify the day-of-month and send-to fields, and also enter test email addresses in the emails field. The emails will be sent at midnight of your local timezone.
Conclusion
This concludes our user guide for Automation 2.0. We will continue to update this user guide as new triggers and new actions are added. Automation 2.0 will encompass almost every feature Alli has to offer. As such, if further details are required, please consult our User Guide Directory.
Learn More About Allganize's Technology