[Updated] Alli User Guide - Skill Editor
Follow these easy steps to build a skill. #skill #chatflow

Alli's skill editor has intuitive GUI so anyone can easily design nice skill in minutes. Here's an overview of what it looks like.
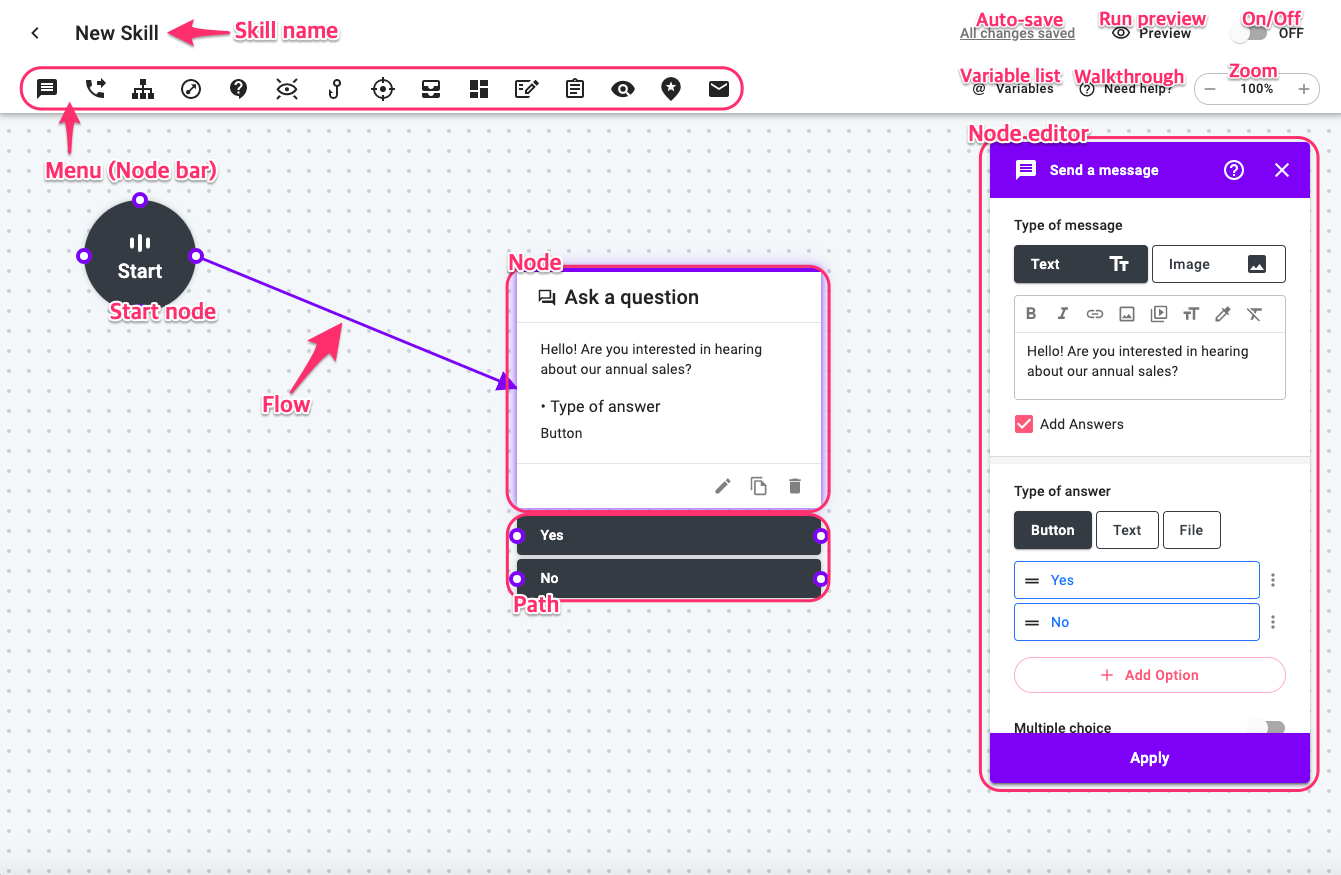
Skill Name: You can change the Skill name here.
Auto-save: Changes are automatically saved so you have the most up-to-date version of the skill. When you make a change, you’ll see the status ‘Saving …’ and changed to ‘all changes saved’ when it’s done.
Preview: Click here to test the current skill.
On/Off: Turn this on and the skill will go live. The skill cannot be edited with this turned on.
Start Node: The beginning of the skill flow. You can’t remove it. Connect the Start node to the first node your users should see.
Node: Skill is about following the flow and running the next node. In the example above, Alli will show 'Hello!' message after the start of the conversation. To learn more about different types of nodes you can use, please see the 'Node Bar' section below and follow the links.
Node Editor: Clicking on the edit icon opens up the node editor. You can edit the content of the node here. For more details, follow the links to each node guides from the 'Node Bar' section below.
Paths: Some types of nodes allows you to set different branching paths so you can set different flow from each path. In the example above, you can set different paths for depending on the user's selection between 'Yes' and 'No'.
Flow: To create flow, drag from purple dot on the previous node to anywhere on the next node. In the example above, the flow is made by dragging from the Start node to Ask a question node.
Walkthrough: Basic walkthrough tutorial to design skill will be played.
Zoom: Sometimes the skill gets a little too big or too small. You can zoom in or out to make the page easier to read.
Variables List: Allow you to view all available variables or a list of variable used in the skill.
Menu (Node bar): Building a skill is all about connecting nodes with arrows. Create a new node by clicking on one of the node types in the menu then drag to connect the nodes. Node names below are linked to detailed guide for the node.

- Send a Message / Ask a question: The most used block type: use Send a Message blocks to send text, images (JPG, PNG, GIF) or video. You can always use this node to ask your users a question.
- Contact Agent: If you want to connect the conversation to a real human, you need to add a Contact Agent node. You can add a Contact Agent node at any time of the flow and the system will automatically look for an available agent to continue the conversation.
- Add Condition: Add Condition allows you to hyper-personalize your final User Experience. You can split the skill depending on the existence of a field, the fact that it's equal (...equals...) to something or that a variable containing a specific keyword. You can also add additional conditions by clicking on Add Condition.
- Jump to Campaign: Avoid creating a huge skill by connecting different skills.
- Answer with Q&A: User questions will be automatically answered using your uploaded Q&As (See Q&As in the Knowledge Base menu).
- Answer with Documents: MRC (Machine Reading Comprehension) AI extracts and show answer to the user questions from uploaded documents on Alli.
- Integrate Node: Integrate allows you to send data to or receive data from a third-party or your server when the skill reaches the block.
- Determine Intent: You can determine pre-defined intent from customer input using this node. Once the intent is determined, it could be saved in a variable and may be used in other nodes, such as Conditional Logic.
- Fill Slots: You can specify parameters that indicate the information that the node needs to fulfill the user's request. These parameters are also known as slots.
- Send Custom UI: Send CustomUI is a way for you to push data to a custom user interface in the skill. Our partner implemented a carousel to be used in the Alli skill. It dynamically pulls in the appropriate data based on the conversation.
- Assign Value: When you need to update value of a user variable or other details in the skill, add the variable you wish to update to the node, enter the new value. The value will be updated when the conversation reaches the node.
- Build a Form: You can ask customers to input a series of information to be stored and send it to agents via email. This new feature is handy when there's any required information you should get from customers.
- Add Observers: Observer node monitors the skill and detect changes of assigned values to trigger actions in the middle of the skill. This node is often combined with the Add Condition node.
- Jump Point: You can add Jump Point node in any skill to specify the destination point for the Jump to Campaign node.
Learn More About Allganize's Technology